Retaining bar vs knitting machine model chart

The table below lists the lengths and widths of various knitting machines I measured myself. Use this table as a reference to ensure you purchase the correct retaining bar for your machine.


Model
Retaining bar
materialsponge?length, inch/cmwidth, inch/mm
Brother KH500metalyes41/1040.375/10-10.5
Brother KH551metalyes41/1040.375/10-10.5
Brother KH552metalyes41/1040.5/11-11.5
Brother KH581metalyes41/1040.5/11-11.5
Brother KH585metalyes41/1040.5/11-11.5
Brother KH588metalyes41/1040.5/11-11.5
Brother (Genie) 710metalyes41/1040.5/11-11.5
Brother KH800metalyes41/1040.5/11-11.5
Brother KR810 ribberplasticno
Brother KR830 ribberplasticno
Brother KR850
ribber
plasticno
Silver Reed SK120metalyes42/1095 mm/0.2 inch

About retaining bars in knitting machines and ribbers.

… this article is in constant progress as I learn about various knitting machines and their retaining bars.

Almost all knitting machines and ribbers have retaining bars. Some machines have retaining bars with a sponge attached to them. Some machines (the majority of plastic flatbed machines) have only a long and narrow sponge (without the metal holder). Ribbers come with either a “retaining bar+sponge” assemble or only with the plastic retaining bar (no sponge strip).

The main role of these retaining bars is to hold the needles in place and to prevent it from bouncing up and down when knitting.

Below are the situations when you want and need to remove (and inspect in many cases) the retaining bar:

  1. When you just purchased your machine (especially used and NOT recently serviced), the first thing you need to do is to remove your retaining bar and inspect it. I made a short video on how to do it because I have been asked about it so many times by my customers.
  2. When you need to replace faulty needles.
  3. When you need to clean your machine.
  4. When you notice your knitting machine mispatterning without any good reason.

Hopefully, you purchased your knitting machine new or recently serviced. In this case, the sponge should be 1-2 cm above the metal edge of the retaining bar.

But in most cases, this is not the case. Thus, it is possible that when you remove the retaining bar, you will see a disintegrated sponge. I’ve seen some spongy strips being just a gooey mess. The old sponge needs to be removed as soon as possible (since it often corrodes the needles) and replaced.

There are two ways to approach this replacement.

First approach: just replace the spongy strip

If you decide to replace the sponge, you will need to remove all this goo. I first use a flat-head screwdriver to scrape all the residue out of the retaining bar canal. Then, I use “Goo Gone” to remove the rest of the residue. I typically do it outside because it is a very messy process. I pour a thin layer of “Goo Gone” liquid into the retaining bar and wait for hours. Then I scrape the remains of the old sponge again with the screwdriver. Lastly, I wash the retaining bar with soap and water, wipe it really well and let it dry (or blow dry it). You can purchase just the sponge in my store.

I sometimes read in forums that some thrifty machine knitters get a simple weather stripping and use them as sponge strips. Well, those have different dentistry and sometimes do not have a silky ribbon on one side. Also, they are not suited to be exposed to oils and might decompose rapidly leaving a sticky (potentially unremovable) residue inside your machine.

I read that experienced machine knitters use different ways to attach the spongy strip to the retaining bar. (By the way, the width of the spongy strip is not as critical and it can be a little bit narrower than the channel of the retaining bar but not by much). I tried different glues and my current choice is hot glue. Some machine knitters use wood glue. I apply the glue to the metal part of the retaining bar and attach the strip to the metal by the sponge side (not the silky ribbon side). I then tape the ends if the sponge to the plastic ends. I like using medical tape. Only one layer of the tape is enough to secure the ends of the sponge. More layers will only get stuck when you insert the newly refurbished retaining bar back into the machine. To avoid stripping this tape, push it down on the ends of the retaining bar while inserting it into the machine.

Second approach: buy a new retaining bar

Or if you do not feel like dealing with all this mess, you can purchase a retaining bar with a sponge already in it. Before you order a new retaining bar, make sure you measure the dimensions of your old bar: its width and its length.

Most commonly used by machine knitters Brother, Studio/Silver Reed/Singer, and Toyota knitting machines have somewhat similar retaining bars but there are some differences depending on the model and the gauge of the machine.

For the retaining bars for these machines, there are three different lengths (41, 43, and 47 inches) and two different widths (0.375 and 0.5 inches). This is why it is important to measure your old retaining bar to ensure that you are getting the retaining bar suitable for your machine. Most JUKI, Toyota, Silger/Silver Reed/Studio, Artisan knitting machines use 0.375-inch wide retaining bars. The lengths are either 41 or 43 inches (depending on the model).

I’ve read stories on FaceBook groups, where the new machine knitters were puzzled by the fact that they JUST replaced the sponge bar and the needles do not move, advance, or retract the way they are supposed to. I especially see I happen to be the owner of 8-push button Brother knitting machines. There is somewhere out there some incorrect information on the retaining bar for these machines. 4-push-button machines use a 0.375-inch wide retaining bar and the 8-pushbutton machines use a 0.25-inch wide retaining bar. (I’ve refurbished over a dozen pushbutton machines and I know the difference first-hand).

Brother ribbers use plastic retaining bars without sponges. When (re) inserting the retaining bar into the Brother ribbers, the concave surface (the “channel”) should face you.

There are machines with unique retaining bars – I will update the blog soon when I learn more. I am also putting a table on machines (and models) and retaining bar compatibility. Stay tuned!

In the meantime, enjoy your adventure in retaining/sponge bar replacement!

PS. I measured several dozens of retaining bars with my calipers. Even though the “official” measurement is 0.375 and 0.5 inches, mine are measured as 0.40-0.41 and 0.44-0.46 inches respectively. This inaccuracy in inches makes me like the mm scale (aka metric) a bit better. So the narrower retaining bars are 10.0-10.5 mm while the wider are 11-12 mm wide. Who knew that just 1 mm would make such a difference but it does! I had an incorrect bar installed on my KH581 8-pushbutton machine and the needles would not go back from E to B (or A) position!!!

Tension spring for Brother Knitting machine

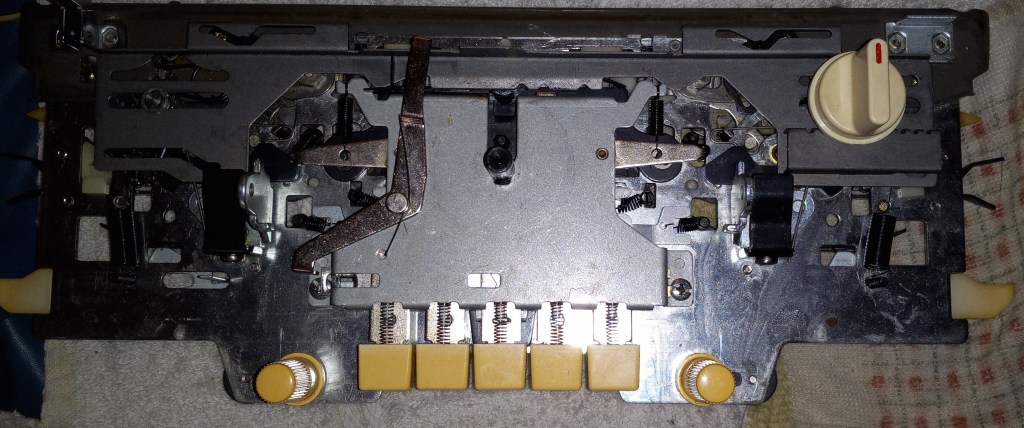
Carriages of Brother knitting machines have several types of springs to ensure smooth needle handling. This article is about a medium size spring, part of the intricate mechanism of Brother knitting machine carriages. These springs can be purchased in my store.

In particular, this short blog article is about a tension spring responsible for smooth the movement of the middle button on the carriage. (At the end of this article, I show other places in the carriage where the same type of spring can be used). This button is typically used to knit fair isle or/and to reset all other buttons.

To expose that spring, one needs to remove the plastic carriage cover (this step NOT covered in this article) and then remove the metal cover.

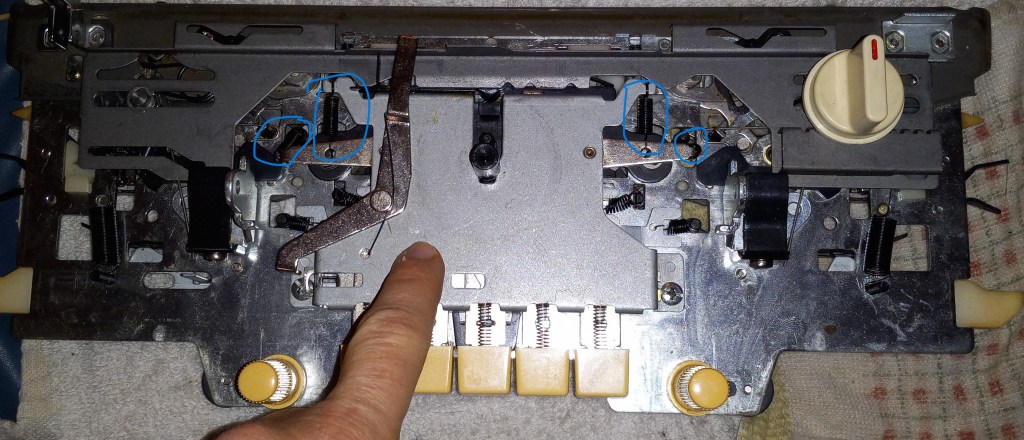
For that purpose, remove the two screws marked below.

The plate will then hang by the springs marked in the picture below but they do not have to be removed. Just push the metal plate out of the way. If the springs detach, they are easily to put back. Just take a picture of the agreement before removing the cover.

Once the cover is removed, you will see the springs right away. In my case, one of the springs was simply missing and the mechanism was not retracting automatically the way it was supposed to.

So the replacement spring was placed where one was missing. I made a short video showing where the spring was installed.

“How” the spring was installed is NOT shown in that video because it is kind of hard to capture how to attach the spring. But the loops of the spring need to grab the posts marked in the picture below.

The same spring can be used in positions shown below. The springs marked with crosses are either small/bigger in size or a spring without the loops (springs for the buttons) and thus, cannot be used.

Brother KH840 cleaned and tested in September 2023

Brother KH840 knitting machine is a knitting machine capable of creating patterns using a punch-card-reading mechanism. The machine has 200 needles, spaced 4.5 mm apart, which makes Brother KH840 a standard machine. Read more about this model in my Knitting Machine Encyclopedia.

Now about this particular Brother KH840 machine. This Brother Knitting machine was cleaned, serviced and tested by me in September 2023.

Removed, inspected and cleaned all needles. The ones that were bent were replaced with the new stock. I replaced sponge in the retaining bar.

The carriage, sinker plate and then punchcard reader were cleaned, serviced and oiled.

I also knitted on the whole bed (using all 200 needles) to make sure all needles form nice and even stitches. I knitted the whole bed using tuck-, slip- and fair isle patterning. See a video I created of these tests. I did not test lace and weave capabilities of this machine. All levers and knobs move freely on lace carriage.

This machine comes with all major …(lace carriage, cast-on combs and extension rails)…

… and minor assesories.

All minor accessories fit into a built-in compartment. All major assesories fit into the case lid when now in use.

A couple of very minor assesories missing are:

  • Bottle with oil (it was too old, and I had to discard it. I recommend using Gun Oil).
  • Wax
  • Cast-on thread (any silky and strong thread will work fine).
  • Hard copy of the manual will not be provided but I can be downloaded online for free from here.

The machine comes with a set of punch cards but they might be slightly different from what is shown in the manual. Please, swatch before knitting for garments and knitted panels.

About imperfections:

Everything works great on this machine. The only minor flaw (with the exception of minor bumps on the case) is the small rust spots on the sinker plate and tension mast. They can be barely seen and when I used this machine to knit a cowl, there was no static and everything worked smoothly.

Overall I did not encounter any problems with this machine (with the exception of couple of minor scratches on the case). I hope you will be a proud owner of it to make a lots of fun and warm garments. Like the one I created (shown below) while testing this machine.

Brother KH830, August 2023, for Vivian

Here is Brother KH830 knitting machine prepared for Vivian in August 2023. Read specifics about this model in my freshly published Knitting Machine encyclopedia. 🙂

This particular machine was cleaned and thoroughly tested on a full bed to ensure all needles worked adequately and that the carriage patterns correctly over the whole bed. The video of these tests is available here.

The sponge in the retaining bar was replaced. All needles were cleaned and inspected. One faulty needle was identified during the full bed knitting. It was replaced.

The lace carriage was not tested in knitting but all levers move as they are supposed to.

Carriage is very easy to move. The handle on the carriage folds for easy storage inside the case when not in use.


The machine comes with all major assesories including extension rails, lace carriage, two (one small and one large) cast-on combs, and all stitch manipulation tools.

Most of the small tools fit into a built-in stoage box.

Minor assesories not included with the setup are:

  • Wax and its storage container
  • Cast-on thread (any smooth and silky thread/yarn will work)
  • Tapestry needle (any sewing needle with a large eye)
  • Oil (I recommend getting a Gun Oil from Amazon)

Below are pictures of the fabric I knitted while testing the machine:

  • “Wrong” side of the fair-isle

  • “Right” side of the fair isle

  • “slip” stitch-knitted panel (using card #8)

  • Tuck-stitch-knitted panel (also using card #8)

    Below is the cowl/neck warmers made from these fabrics:

    Reversible hood/neck warmer made from fair-isle-knitted panel:

The “other”side:

The only imperfection of this machine (with the exception of the minor bents on the case and its lid) is the slight discoloration of the plastic on the carriage due to some UV damage (the plastic on the lace carriage is a bit lighter and has some UV-burn stains). It is typical for these old machines because back in the day UV-damage blockers were not added to the plastics.

Also, a hard copy of the manual is not included but can be found here.

Overall this machine was very easy to use and I did not experience any major issues with it. Hope you will enjoy it too!

Brother KH836 tested in July 2023

Brother KH836 knitting machine is one of the many models of knitting machines with punch-card capabilities manufactured by Brother. The machine is standard gauge (which means the distance between the needles is 4.5 mm). There are 200 needles. It accepts punch cards with 24-holes (which makes it capable of knitting patterns with 24-stitch repetitions).

Unlike its younger counterparts (Like Brother KH892 and KH894), it does not have built-in intarsia. But KH836 works with KA8210 intarsia carriage.

After working on both punch-card Singer/Studio Brother machines, I can see clear differences and personal pros and cons. But both machines are still great and offer a variety of possibilities. The thing I like about Brother punch card machines compared to Singer/Studio ones is that the lace carriage comes as a standard accessory. I like that rails are included as well to put the second or lace carriage to the side while using the main carriage on a full bed. I very much like the presence of the cast-on combs since using them is my favorite (and quickest in my opinion) method to start knitting.

However, unlike Brother lace carriages, Singer/Studio lace carriage (even though it is sold separately and is quite pricey) needs only one pass when knitting lace since it transfers the stitches and knits them at the same time. To me, Singer/Studio’s patterning with drums seems a bit more straightforward and easy to follow, unlike a needle selection mechanism on Brother hidden inside the bed. But again, those are minor differences. I also don’t understand why a rod is needed on Brother to hold the punch card together: it always disappears/loses itself and honestly, I always forget to insert it and the machine knits ok with it anyways. There might be other differences but these are the ones that seem the most substantial to me. Yet, they still do not affect the usage of those machines at all and both companies made very solid hard working machines.

Now about this particular knitting machine, Brother KH836, that I serviced in July 2023.

It comes with all major and almost all minor assesories.

All accessories can be stored in a convenient built-in compartment.

The minor assesories missing are:

  • Cast-on thread: any smooth strong yarn will do (not too thick though)
  • Wax – the one that came with the machine was too old and just crumbled
  • Oil – the one that came with the machine was too old and yellow so I discarded it. A good oil for knitting machines is gun oil available on Amazon.
  • A hard copy of the manual will not be provided but an electronic copy can be found here.

The absence of these assesories absolutely does not affect the functioning and use of the machine.

The work done on this machine:

  • Inspected and cleaned all needles;
  • Cleaned the main bed and under the lid;
  • Serviced the patterning mechanism;
  • Replaced sponge in the retaining bar
  • Serviced carriage – oiled and got all buttons unstuck

The machine was tested on a full bed (to make sure all needles and needle latches are in excellent shape) using stockinet, tuck-, -sli- and fair isle stitch-patterning. All looked perfect. See the cowls/hoods below I made from the fabric knitted during tests.

The beige/greenish yarn was somewhat borderline thick for this machine to knit on all needles (not every-other needle). The slip- and tuck-stitch patterning were still perfect on a full bed (see my video of all tests). So, the fair isle with beige/green yarns was giving me some minor mispatterning. When I switch to thinner yarn (brown/camel natural colors), I did not have any troubles with fair isle.

Case is in pretty decent shape with only some minor dents and scratches. Overall the machine is in great shape and no visible rust on the main bed.

I cleaned the lace carriage and checked all the knobs and levers but I did not test any lace-patterned knitting.

This machine and other Brother punch-card machines are easy to maintain. Spare needles are still available for purchase new and on a used market. Sponge-bar needs to be replaced 1-2 times a year depending on usage. With regular cleaning (suck out by vacuum all lint and dust from the machine) and oiling will prolong the life span of this machine to almost forever. This machine is perfect for people who want to knit something quickly with predetermined patterns, who like creating their own patterns by punching holes in the cards and for those who are looking a bit more functionality than simple manual machines. There is a myriad of additional assesories available for Brother machines, which makes this machine a very desirable tool for volume knitters and for those who just like to experiment and create garments for family and friends. Now about imperfections. Some minor rust on the carriage – it is typical whiteish rust. A potential problem might be additional static, which can be handled with wax. I did not experience any static with this carriage/machine and did not need to wax my yarn (I used acrylic yarn). These rust spots are actually very minor (compared to some carriages I’ve seen and those still worked). So, besides mentioned above, I do not anticipate any problems and I did not experience any during my tests.

Hope these imperfections will not stop you from adopting this hard-working machine capable of creating a lot of beautiful garments and things.

Singer 360 with 700 carriage for Isabella

Singer 360 knitting machine is a standard gauge knitting machine (distance between needles is 4.5 mm). The machine has a built-in knit leader. It patterns automatically using a punch-card mechanism.

Specifically about this machine cleaned for Isabella:

The carriage that came originally with this machine was acting up. I opened it up to fix and noticed that somebody already tried to fix it and assembled it incorrectly. I did not want to delay the delivery of the machine so this 360k will be equipped with a more advanced carriage from a 700mod model and a matching sinker.

The main bed, all needles, all knobs and levers on the punch-card reader and knit leader are in excellent shape. All needles were inspected and the machine has a new sponge. The machine was tested on full bed to knit stockinet, slip-stitch, tuck-stitch and 2-color fair isle patterning (see my video with these tests). All needles behaved flawlessly and the carriage was moving freely without any problems at all. I was very pleased! Below are the panels I knitted. As always, these will be converted to cowls/neck warmers for charity.

In general, all knobs and buttons on 360 and 700 carriages are the same. One major exception is the levers for the tuck-knitting. 700 carriage does not have those levers. It was actually very easy to knit a tuck-stitch pattern with this carriage. I had zero problems from the beginning. The tuck-brushes on the 700 carriage do not have to be moved and they do not get tangled in thread when knitting. All these are huge advantages.

I did not test the knit leader but all knobs and levers move freely.

The machine will come with all major assesories.

A couple of minor assesories missing are:

  • Only two yarn separators are included. These are needed to knit single-motif. So, with just two yarn separators you can still knit a single motif but only one per panel.
  • A tapestry needle is not included: any metal or plastic needle will do
  • Only two point-cams are included. These too are needed to knit single-motif. With just two point-cams you can still knit a single motif but only one per panel.
  • Only one unravel cord is included. I typically use any contrasting yarn: not very thick and preferably very silky.

I also included an extra tool – very useful for beginners: a claw-weight/cast-on comb. In this case, you can knit one row on every other needle, hang a cast-on comb, knit a couple more rows until all stitches are knit, and then knit on all needles (described better in this manual on p. 9)

Because this machine had two major parts from two different machines below is the list of resources and manuals that Isabella will need to knit usefully on this setup. These brochures are available for free and discuss how to use the machines and how to knit garments:

  • Operation manual for 360mod knitting machine. This is a resource to go to when you need to know how to setup your machine, how to assemble it, troubleshoot, etc.
  • Knitting manual describes how to swatch, calculate gauge, how to use pattern paper and a knit leader to knit garments and how to make cloth in general.
  • Pattern book shows how the patterns on punch cards will look when knitted using different techniques. Although some of the cards might be slightly different.
  • Operation manual for 700 machine. Here is learn how to setup the knobs and levers on your 700 carriage.
  • Read pros and cons of Singer 360 in my previous posts:

http://thoughtsandknits.com/2022/09/04/360-for-laura-cleaned-in-august-2022/

http://thoughtsandknits.com/2022/08/07/studio-360-k-memomatci-reported-in-august-2022/

http://thoughtsandknits.com/2021/10/13/my-first-singer-360-memomatic-360k/

Now about imperfections:

The imperfections are mostly on the top lid of the whole case. It has several minor bumps.

There is one bend in the middle but the machine still closes. I decided against beating it up with the hammer to straighten it because It creates additional microcracks and makes the metal more prone to corrosion. The lid still closes with just a small push.


The case panel that attaches to the main bed (the bottom panel) has one bend as well (not shown in here).

The end-cap of the lid has a crack. It is pretty minor so I did not replace it to keep the cost low.

I am 100% confident that you will like this machine like I did!!! Happy knitting!

SRN321 ribber, suitable for Singer/Studio/Silver Reed knitting machines.

This ribber is sold out but check my Store for other ribbers and machines.

If you came here because you are looking for a ribber for your Singer 321 or earlier model knitting machine, you came to the right place.

Ribbing attachment SRN321 is so easy to install (aka, attach to the main bed) and so fun to use! Need one now? Check out my Etsy store.

Want to know more? Keep on reading!

Studio SRN321 ribber is an attachment that allows alternating knit and purl stitches. It was released in 1972. The ribber has 200 needles. Studio SRN321 ribbing attachment fits the following knitting machines: Singer/Studio 321, as well as models MOD. 315, 313, 312 and 305. SRN321 ribber adds so many patterning possibilities, as mentioned in the instructions and beyond. I did not see in the instructions if this ribber can provide double jacquard possibilities and I did not test it myself yet.

About this particular ribber.

I tested it in combination with Singer 321 knitting machine. The carriage slides very easily on the full ribber bed. I feel that the instruction explain really well how to knit all kinds of ribbing.

Tested on 1k 1p rib, double rib (see the cast on-thread and the first several rows below) on 30 needle swatch and on the almost full bed with the singer 321 knitting machine (not shown – forgot to take pictures but check out my video). The 1×1 ribbing created on this machine was so stretchy and pretty! I fell in love The carriage is so easy to move although it might take some time to get used to it (as opposed to using only the knitting machine).

I also tested the partial ribbing on this machine while the main bed was knitting the tuck-stitch pattern (see my video for that as well).

All major assesories included. Minor assesories missing are:

  • Hard copy of the manual will not come with this machine but could be obtained online.
  • Oil (it was old and I discarded it). Good oil to buy for any knitting machine is Gun oil.
  • Screw driver but any flat metal piece would work. It is mostly to screw the large bolts onto a machine. I used a thin coin.
  • Replacement needles: I am currently outsourcing them and hopefully I will have them soon.

I personally did not find any cons with this ribber. It does the job so well. It was absolutely not overwhelming to use and was extremely easy to set up. I think it is an excellent ribbing attachment for beginning machine knitters.

I hope you will be as excited as I was using this ribber. It is available in my Etsy store.

Pictures of upgraded Singer 321 for Katherine

Overall view of the setup.

Right-hand side end cap on the main bed

The left-hand-side end cap on the main bed

The lid with replaced end-caps

The lid end cap upclose

Brother KH260 refurbished in September 2022

Brother KH260 are wonderful and highly desired machines. They habe 110 needles, spaced 9 mm apart from each other).

This distance and large needles makes this machine “bulky”. Brother KH260 can handle a large variety of thicker yarns, including worsted. I tried double-thrded boucle yarn and it ahndled it well as well. I was especially happy about it because I love textures yarn, especially boucle, but not many machines can handle them.


What I did on this machine:

  • Removed all needles, cleaned them and inspected individually and then during knitting on a full bed.
  • Oiled carriage and ensured that all levers and kbod ove frely and do not mis-function during knitting
  • Cleaned the bed and gently cleaned the plastic parts

Overall the machine was in good shape before I started cleaning it. The case does not have any major bends/scratches. Only minor ones.

This machine came with all its assesories with some minor exeptions.

The card clips were missing – I cinluded two paris of new ones (small yellow plastic things in the picture below).

The assesories that are missing from the machine and wll not be included are:

  • Oil canister. I do not include old oil on purpose. Please, get a fresh/new oil. The recommended by many machine kntiters is Hoppe’s Elite Gun Oil
  • No ravel cord is included but any smooth strong yarn can be used.
  • Place card holder was missing from the set. As you can see in the video, I was not even using it and the cardreder worked well. However, any straight or bent hand-knitting needles will work. I included one.
  • -some manuals state that the machine comes wth 20-count punch card set. The hard copy of the manual that came with this machine lists only 15 cards. Indeed, a set containing only 15 cards came with it.


All tools fit into a tool box: a buil-tin compartment on the main bed.

This tool box is excellent to store assesories whlie the machine is not in use. The sinker plate, tuck-brushes, punchcard, tension rod and the row counter also fit wonderfully into the lid of the case when not in use.

The machine size is larger than all other single-bed flat-bed machines. The bed is winder and slitly longer.

The machine performed wonderfully with slip, tuck and fair isle patterning on full bed. I did not even have my usual trial/error starts. I did nothave to putz around too much with tension and the right number of hanging weights…. I was very pleased how well everything went.

I used this machine to knit simple stockinet, fair-isle, slip and tuck-stitch patterning. You can see those in my video. Below are the things I made while testing this machine and filming my demo.

Cowl/hoodie from a variegated dark red yarn using slip-stitch. Reversible/double sided.


Cowl/hoodie with a matching hat. Hoodie was knitted using a self-striping yarn and tuck-stitch patterning. Can be worn as reversible. The hat was knitted using simple stockinet. The ribbing was made by a mock-1×1 ribbing.

Cowl/hoodie knitted using fair isle and custom-made punch card. It can be worn as double-sided/reversible.


I did not really find a lot of cons for this machine. Maybe simple specifics of the machine which make it to stand out.

So, pros and cons are:

Pros:

+ Carriage (despite being heavy) is still relatively easy to move especially in KC mode (attached to a timing belt)

+ capable of handling thicker and textures (typically challenging) yarns

+ accessories, including needles, are still easy to find.

+ straightforward manual

+ because of the usage of thicker yarn, creates a texture similar to hand-knitting. I personally love those large stitches. Makes me instantly feel warm and cozy. The thicker yarn when knitted on loose tension also make the knitted fabric very soft and moldable (not stiff as on some standard machines).


Cons:

– Larger than other machines, including some other bulky models. It is also heavier.

– Expensive as they are highly desirable.

– carriage levers prone to sticking, especially when not in use for a long time. This might result in improper needle selection. But can be done with regular maintenance/care.

– requires more weights than other machines very likely because of heavier yarns.

– tuck brushes need to be installed. Some machines (mostly standard) already have built-in tuck-brushes on sinker plate. This is not really a con but just one more thing to keep track of and not to misplace.


Overall, machine knitters all over the world call Brother KH 260 a working horse. And I am in complete agreement!!