I found a brochure in my stash showing which knitting machines and their accessories were released as anniversary editions (which means the machines had a slightly different color combination but the same functions as their non-anniversary sisters).
Brother KH-260E knitting machine and Brother KR-260E ribbing attachment
Garter carriages KH-93E and KG-89II
Knit leader KL-116E and Color changers KRC-900E and KHC-820AE
Although the color combination is not seen very well in this brochure, all anniversary editions have baby-blue color: buttons, electronic panel, logo, etc.
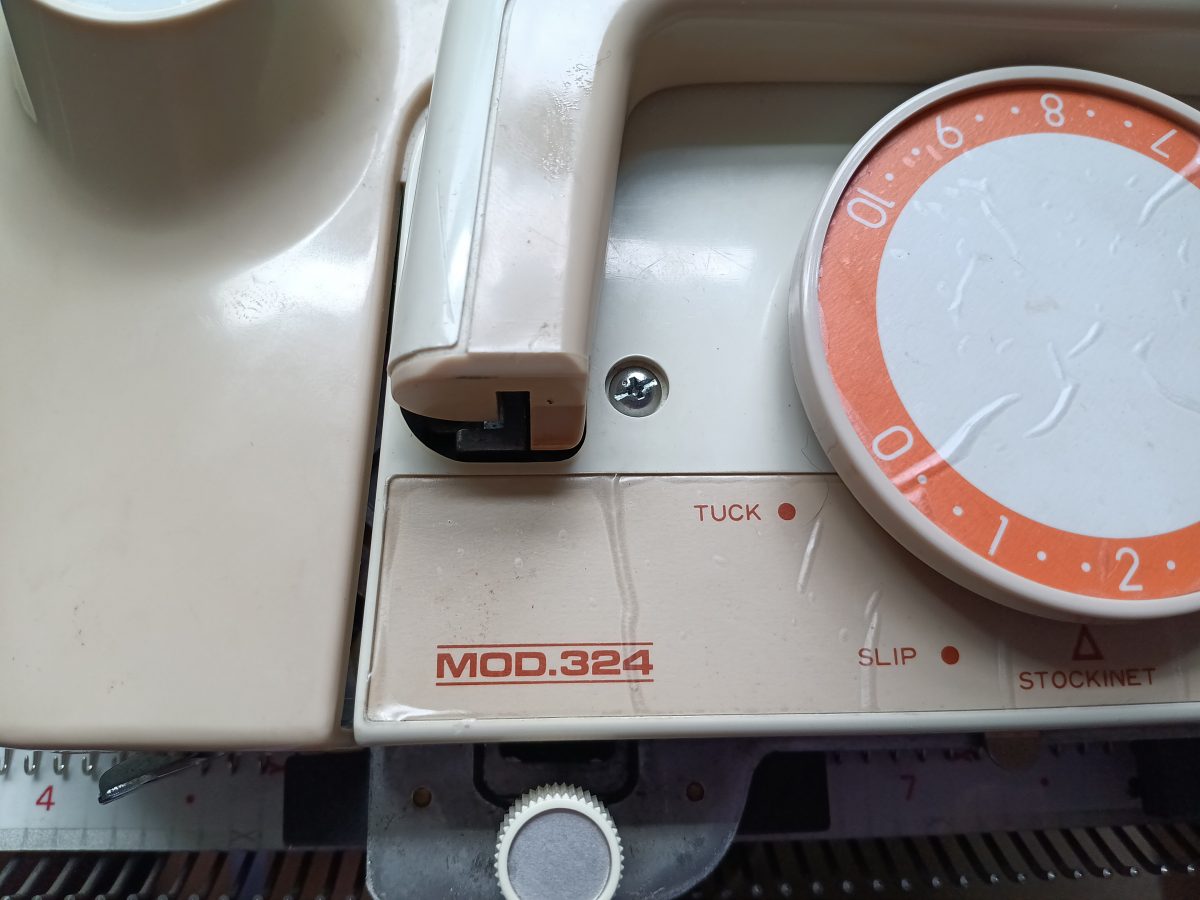
Studio mod. 324 knitting machine is a standard-gauge knitting machine with 200 needles. Read more about this model in my Knitting Machine Encyclopedia. This post is dedicated to a specific machine serviced and tested in my shop in May 2025.
The setup will include the machine with all major accessories and a stand-alone knit radar (model KR7).
The machine, the carriage, the card reader, and the knit radar were thoroughly cleaned. I opened the carriage and cleaned it of old gunk. The atterning drums move freely (see the test video) so do all levers, knobs and buttons on the carriage.
All needles were removed, cleaned, and inspected. All latches were checked on how they move (sticky latches form tucked or other incorrect stitches). All faulty needles were replaced.
I replaced the end racks as well. Some minor discoloration spots, which seemed like rust, were covered with a protective coating.
A new sponge was attached to the original metal retaining bar.
With regards to the minor accessories for the machine:
The machine came with almost all of them. Even the oil looks good, so it will be included (which I normally do not do and recommend getting Hopp’s gun oil off Amazon). The table clamps and the claw weights are new (new stock). The hard copy of the manual was missing, and I do not have one in my collection either. But it can be found online for free. This original manual does not list all accessories on one page. Thus, I borrowed the accessory diagram from the manual of another similar machine. But that machine has a slightly different set of accessories (I know – confusing).
So, the accessories that were supposed to be included but will not be are:
crochet hook (any will work, and honestly, with all the machine knitting work I do, latch hook and needle transfer tools are the most handy tools);
tapestry needle (any needle of your personal choice will work)
cast on cord (any silky and strong yarn will work)
The accessories that are on the diagram below but still not be included are:
rib frame components (they did not come with the machine)
3/1 and 1/3 needle pushers (they also might be for that older machine, and they did not come with this machine either)
needle retaining bar pusher (I honestly have never seen it be included with any of the setups I had experience with. I simply use flat-head screw driver the push the retaiing bar out of its slot.
the intended table clamps are not slanted (the old-fashioned ones) but flat. The diagram above shows slanted table clamps. But this diagram from an earlier model (it still reflects all accessories correctly, just not as accurately). The original manual shows flat table clamps.
The weaving and round brushes are original as well. The only briefly explains what the round brushes are for (and it is also buried inside a lot of other info). There is a diagram showing that these brushes are used for tuck and plating knitting/patterning. I did not test plating, but tuck-knitting was performed without these brushes and it knitted very well on several different yarns.
The toolbox to store accessories is in great shape. All accessories fit nicely into the box.
Apparently, the lid can be hooked onto the one of the sticking metal “screws” to use as a tool tray (refer to the manual).
The punchcard set looks like the original one. It includes the card with the description, which punchcards can be used for what kind of patterning, in case they don’t match what the manual mentions.
I am also including two custom punchcards (as a thank you for waiting for my patience customer! :))
I am also including two extra card clips (transparent ones) as I think the original white ones are kind of hard to clip.
The setup will include a stand-alone knit radar KR7. The hard copy of the manual will not be included but a pdf copy is available online.
As you can see in the video, the carriage moves super smoothly when the needles are in A and B positions (I was able to move it with just one hand). All levers, buttons, and drums move well too, which is extremely important for patterning and advanced knitting.
I tested the carriage by knitting swatches using different yarns (not all shown in the video) as well as on the full bed to ensure all needles form correct stitches. I like doing full-bed tests with card #1 because any mispatterning or faults will be noticed immediately (even the tiny random ones): the fabric will not be even.
In the video I show tests with tuck-, slip-, and fair isle stitches/patterns using Etamin yarn (for hand knitting). I also used slightly thicker yarn (sport weight) but it needed the loosest tension possible. These tests are shown at the end of the video. However, it is recommended to use sport-weight yarn on every other needle.
Knit radar:
It is in great shape and looks like it has barely been used. It will come in its original (although kind of beat up) packing cardboard box.
However, it did not come with a hard copy of the manual but a good quality online version can be found (for free) here. One plastic panel chipped on the side (not shown) – I glued it together. It is barely visible. It does not affect the functioning of the knit radar.
Stitch scale #4 is missing. If I find it, I will ship it later for free.
If I think of something else while I pack the machine, I will post it accordingly.
The original pattern paper is missing, but I am including a generous 5-sheet pack of graphed paper. It is wider but can be easily cut. It is the same quality (thickness and feel) as pattern paper for other knit leaders I have (but they are half size).
When I was looking for a replacement pattern paper, I did a lot of research. Even if I found the original paper, the overall opinion in the knitting machine groups is that the models of the closing on those patterns are outdated. So it feels like you will be better off using he graph paper for your own designs than having the original patterns, which would be useless.
Some imperfections include the missing accessories (described above), some minor scratches and dents on the case, and discoloration on the plastic parts (from exposure to sunlight). Some are shown below.
I enjoyed working with this machine and testing it. It has a lot of life in it – unlimited if well taken for! Happy Knitting!
Knitting machine Studio mod. 360 coupled with the Singer MemoMatic 360K carriage, was serviced and fully tested in my shop in May 2025. To read the pros and cons of the Studio mod. 360 and Singer MemoMatic 360K read the corresponding posts in the Knitting Machine Encyclopedia. The post below is dedicated strictly to this specific machine and not the model overall.
This girl was manufactured in the 1980s (45 years ago) so it comes with its own character (read below in Imperfections).
The machine was thoroughly cleaned. I removed all plastic panels and cleaned them. I removed plastic end caps and clean inside the needlebed with the brush until not more lint and dust as coming out. The needlebed was vacuumed from inside and outside. All metal parts were oiled. The punchcard reading mechanism was tuned and cleaned with oil. Same for the carriage. All needles were removed and inspected and then tested on the full bed (knitted on all needles). I identified one faulty needle (the video shows the incorrectly formed stitches) and replaced it.
In fact, tests on full bed were performed using tuck-, slip- and fair-isle stitches. All stitches formed as they are supposed to. There was no mispatterning (see the full video). The video also shows that all buttons, levers and wheels move freely on the knit leader and the paper advances accordingly. Read the manual carefully when setting the knit-leader parameters as some of the knobs move at certain settings. The video also shows that the row counter work great as well.
I replaced bent plastic heel protectors (plastic circles around each wheel with soft brushes on the under side of the sinker plate – now shown). They bent kinda easily when the yarn is tangled around the wheels on the sinker plate.
Installed new end racks. I replaced the sponge in the retaining bar. The retaining bar sits a bit tight so if it needs to be removed, initially use pliers to get the bar the first tug.
The drums on the carriage move freely (see the video). The carriage with and without sinker plate moves freely on the carriage across the needles in A and B positions. Read below about some accompanying clanking noise.
The machine will come with all major accessories.
Those that are not included are:
unravel cord (any smooth and strong thread or yarn will work);
tapestry needle (any needle will work)
punchcard rod (all tests i performed and shown in the video were done without it and it worked well).
oil (I get oil for my knitting machines on Amazon: Hopp’s gun oil)
punchcard set has all 20 cards and they are original Singer/Studio punchcards but some are somewhat different than in the Pattern Book
A hard copy of the machine instruction manual will not be included but it can be downloaded online for free. The hard copies of the knitting manual and the pattern book are included.
Despite some discloration of the plastic and metal of the main bed, the case lid, and the needle bed are in overall good shape.
Imperfections:
There was some yellow discoloration, which could be potential rust spots. I covered them with a couple of protective coatings. The covered spots are not as noticeable in real life as shown in the pictures below. In fact, when I am looking at the machine right now, I can’t even see it (but I know it was there).
2. One of such spots is actually the railing itself (I needed to be 100% sure that there will be no further degradation due to rust). So I applied a thin layer of protective coating as well.
In some places, the coating comes of, which comes across as some minor debris. Just be aware of it (and not alarmed). Include cleaning the debris and carriage rail in your regular knitting machine cleaning routine.
3. It seems that either the plastic panels (including the end caps) were replaced by the previous owner, or the machine was exposed to the sunlight unevenly. Regardless, you can see that some panels show a different degree of yellowing (discoloration of the old plastic due to exposure to the UV light/rays). However, the plastic does not seem fragile (I’ve seen a LOT of weakened (due to UV) plastic parts). So the difference is only visual/aesthetic.
4. When I first started testing the machine by moving an empty carriage on the needlebed (with all needles in A, non-working, position), there was some clanking noise in some areas. I tried various carriages on this machine and they all sound like this. After troubleshooting this issue, I was able to improve it (watch this video on this issue) but due to the nature of this noise, it is not completely eliminated. This video discusses how to prevent/minimize that clanking noise. However, with regular maintenance and paying attention as well as moving the carriage in one smooth motion, this will not be an issue.
Despite all these imperfections, I enjoyed working with this machine. I made the gift bag below using various stitches shown in my test video (working on the pattern now).
Singer MemoMatic 700 is a standard-gauge knitting machine with 200 needles, 4.5 apart. It has a punchcard reader (on the machine body) and patterning drums (on the carriage) which allows the machine to automatically select needles and knit patterns, like tuck, slip/part, fair-isle, weaving, lace, etc. Read more about this model in my Knitting Machine Encyclopedia. The rest of the post below is dedicated to a specific Singer MemoMaic 700 machine serviced and tested in my shop.
The case (including the end caps and the lid) is in great shape with minium scaffs and scratches. The plastic panels are in great shape too, with minimum discoloration due to the exposure to UV.
I cleaned the surface of the machine and the inside of it as well. I serviced and cleaned the punchcard mechanism and fine-tuned it to ensure flawless patterning. I opened the carriage and cleaned it thoroughly too, to ensure the drums and all other internal mechanisms move freely. The rubber wheels on the sinker plate were too fragile, so I replaced them with the old stock.
Installed new end racks (new stock).
I replaced the sponge strip in the retaining bar. I cleaned and inspected all needles to ensure they are not bent, latches move freely, and form correct stitches. Then I knitted on the full bed (i.e., on all needles) using tuck, skip/part, and two-color fair-isle to ensure that all needles indeed form correct stitches. I used several different kinds of yarns (you will even see in the video that the machine handled a couple of minor knits pretty well). I was very pleased by these tests, as the machine indeed handled well all the various yarns and all stitches formed correctly. The video of these tests is here.
The machine comes with all original accessories for the knit leader.
Knit leader was not tested in action but I checked all buttons, levers and knobs: they all move freely.
It comes with almost all the machine’s accessories.
The accessories fit nicely into a built-in box.
The standard accessories that are missing are: two cast-on threads (only one is included) and the oil (Hoppe’s Gun oil from Amazon is an excellent substitute).
The carriage lock is now shown in the list of accessories but the original metal carriage lock is included.
Note: The machine did not come with the original punch cards. I am including a generic set of 15 punch cards. Also, hard copies of the manuals are missing as well. But they are available online for free: pattern book, knitting manual, and operation manual.
The machine is lucky enough to come with its own cardboard box as well (with a lid).
Now, about Imperfections:
– Because I applied cleaning oils during cleaning, you might notice that some of the oil might bleed out of the carriage (especially when moved back and forth several times), leaving some black-ish residue on the main bed. Just wipe it with a towel and continue knitting. This is not unusual as the oil becomes thinner as the carriage becomes warmer as it moves back and forth.
– when the lid sits on top of the main bed, there is a small lip. It is pretty typical for these old machines and does not affect the works of the machine. However, precuations will be needed when the machine is in storage: put it in a plastic bag when stored for a long time.
– The carriage handle has some minor scratches.
– The case also has some minor scratches and dents. But it is overall in very good shape.
I typically include pictures of an item I made while testing this machine. I indeed made a small blanket and a gift bag, but due to the time contains, they are not quite finished yet.
I think the new owner of this machine will be very pleased with it because it not only looks good, but it works fantastically and has some advanced functions other punchcard machines don’t: like built-in intarsia.
A vast majority of knitting machines on the current used market are from Brother and Silver Reed (also released under the Singer, Studio, and Empisal Knitmaster, Riccar, Silver names) manufacturers. In turn, a lot of models from these makers are machines capable of patterning using punch cards.
This article gives a general comparison of the punch-card reading and patterning mechanism of Singer/Silver Reed/Studio/Empisal knitting machines versus those released to the markets by Brother Co.
The patterning mechanism of Brother punchcard knitting machines is activated when the carriage is locked into the timing belt. Silver Reed (and also some of the Toyota models, like Elna EK2300) machines have patterned drums on the carriage.
I find that knitting on machines with patterning drums is a bit quieter than when knitting on machines with a timing belt. However, it is somewhat easier to move the carriage when it is also guided by the timing belt.
Both types of machines have their own problems. For example, yarn often tangles on machines with patterning drums. While machines with timing belts have a lot of issues with timing belt misalignment.
However, I find it easier and more straightforward to set up a tension mast on the Silver Reed machines than on the Brother. Sometimes I feel that when I unfold the head of the tension mast on Brother machines, I bend it too much.
Concerning the tension masts: there are two slots on Singer/Studio/Silver Reed/Empisal machines (and they are in the case handle – so in the middle of the needlebed) to insert the tension mast. On Brother machines, there is one in the middle. The tension mast seems more user-friendly than Brother masts: it is so easy to lock the head with tension wires into the right position on Silver Reed than on Brother.
I like that on Brother machines, the needles move forward according to the punch card. So, it is somewhat easier to see if the machine mispatterns. On Silver Reed/Studio/Singer machines, all needles (selected and not selected according to the punchcard) remain in one position (B). Thus, sometimes it is hard to see if the pattern is transferred to the needles correctly.
Patterning of the Singer/Siler Reed/Studio/Empisal knitting machines occurs when the drums pass the patterning center. Brother patterning occurs when the timing belt is latched onto the carriage (by activating the KC button). Thus, it is very important to follow the instructions on how to start knitting and patterning using the punch cards for both models.
Clearing of the patterning in Silver Reed machines occurs when the lever passes the “clearing center “, while on Brother, the patterning selection changes when the carriage turns.
After working with it, I feel that standard-gauge Singer/Studio/Silver Reed takes yarns thinner and smoother than the same gauge Brother machines. It seems that Brother machines can handle yarns not just thicker but with a wider variety of textures. But it might be just my experience. Working with various yarns is always an interplay between tension, use experience, how tight the yarn is in the cake/cone, static (which depends not only on your yarn but on the condition of the bed and your environment, which also changes seasonally), etc.
The more I knit on Brother and Silver Reed punchcard machines, the more I am discovering that the ever problematic tuck-stitch is better knit on Silver Reed machines. On Brother machines, I need to find the perfect combination of yarn, its tension, weights, speed of moving the carriage across the bed…. In silver Reed machines, I do not even think about all these precautions…. I strongly suspect it has something to do with the way the needles are selected and the stitch is patterned.
*KH800 and KH801 models have a slightly different punchcard mechanism and thus are not considered in this comparison **KH811 also has pushbuttons in the patterning center. Punchcard reading and needle selection work like in all other Brother punchcard machines.
*** Some Elna machines have patterning drums similar to those of Silver Reed machines. This is why Elna machines are in this table/article.
Brother KH892e is a blueish-color combo (anniversary edition) of the standard-gauge knitting machine Brother KH892. Read more about the pros and cons and features of KH892 in my Knitting Machine Encyclopedia.
This blog post is dedicated strictly to the Brther KH892e I serviced and tested in my shop in March 2025.
I removed the old sponge, cleaned the metal section of the retaining bar, and removed, cleaned, and inspected all needles. I was checking each needle for good latches, for being straight, and for having no rust.
I cleaned, serviced and inspected the punchcard reader mechanism, timing belt, and the drums guiding the timing belt to ensure absolutely reliable needle selection and patterning. The carriage was opened and deep cleaned as well.
After the machine was thoroughly serviced and cleaned, I first tested on all number of needles to ensure all carriage functions run well. I knitted stockinet first and then fair isle (see the video).
Then, I tested the machine on all needles to ensure that all needles formed correct stitches and that the needle selection worked across the full needle bed. All tests passed with flying colors (see the video).
The machine came with some accessories missing but I was able to source most of them out. So I included new-stock claw weights, table clamps, transfer tools, replacement needles, punchcards, and card snaps. I only used them during my tests.
The tension mast also did not come with the machine so I am including a brand new (new stock) mast. It is a bit hard to insert (and then to remove) it into the place for the tension mast but I kinda like it because sometimes when the tension mast sits too loose, it is too wobbly and messes up with my knitting (or yarn tension).
The cast on comb did come with the machine. It is a new design where the two sections, a longer and a shorter one, attach to each other. Well, the slide out each other easily. But I was still able to use it without problems. (All my tests in the video were made with that cast-on comb). I actually find of like it because in the past, some of the cast on combs attach to each other so hard that it actually hurts to pull them apart.
The original lace carriage will come with the machine. I cleaned the carriage and tested all the knobs but I did not test it in action. It is a simple enough carriage where I do not anticipate any problems.
The hard copy of the manual will NOT be included. But a free online version can be found here.
The punncard set (20 cards total, like in the manual) also did not come with the machine, so I included a set I purchased from new stock. Card #1 was used quite extensively during my tests, so it is a bit bent (which still did not affect its functionality). But all other cards are in great shape. Some match the cards in the manual and some don’t.
Cast-on lace is not included, but any strong, thin (and preferably silky) yarn will work the same. A tapestry needle is not included: any needle of your choice with a wide eye will work as fine. The oil will also not be included. I use Hoppe’s gun oil I purchase on Amazon for everyday lubricating and when I clean needles.
The original metal carriage also did not come with the machine. I am including a 3D printed plastic one.
The punchcard holder pin is also not included but all the tests I ran in the video were done without it so it is actually not such a critical component.
I replaced broken plastic rivets with new ones (new stock); therefore, some of them look whiter than others (not shown).
The little cap for the punchcard reader lever was cracked, and I replaced it with a new 3D printed one (on the right-hand side in the picture below).
Some of the imperfections:
– since I oiled the machine really well and used greaseless lubricants to clean the old gunk/first, the first tests might cause he machine to “sweat”( meaning the excessive oil might come to the service when heated due to the carriage being moved back and forth). Just have a piece of cloth by your side to wipe it away. It is shown in the video of my tests.
– The tension mast sits very tightly in its socket on the needlebed. Thus, some pressure/strength needs to be applied when inserting and pulling the tension mast out.
– Some of the teeth on the cast on the comb are a bit rusted. I chose to leave them be instead of risking them being bent. This is NOT a critical con at all.
– There is a tiny crack on the lever on the sinker plate. I see it pretty often in punchcard machines. It is not critical and does not affect knitting.
The spring that holds the lace carriage in the lid is acting up. I do not have a replacement spring, but this is a very non-critical component. I am posting it here so you are aware that it is not behaving when the lace carriage is removed from the case and put back together.
– The case and the lid have minor scratches and bumps. The most serious ones are shown in the photographs below.
Despite these minor flaws, this machine is beautiful and works beautifully.
I made the gift bag below from the fabric I knitted while testing this machine. Hoping the new owner will enjoy it too!
This tutorial describes step by step how to make a double-layered blanket on a knitting machine without a ribber. The cables are separated by mock purl stitches to make them stand out.
The demo below was made on a bulky knitting machine (Brother KH230), but it can be applicable to any knitting machine of any gauge (standard, mid-, and fine-gauges): push-button machines like Brother KH551 and KH588, punchcard machines like Brother KH840 and Studio mod. 360, Silver Reed SK280 and even electronic knitting machines without using their electronic functions, just to name a few.
The video of the steps can be found here. My two yarns were different (the fuchsia yarn was thicker, and the pink yarn was thinner), so I had to knit a couple of swatches to figure out how many rows to knit to have the same length measurements. If you are a bit off, blocking will solve it (like ironing in sewing). By knitting swatches, you’ll also determine what is the best tension to run the yarn of your choice at.
1. Knitting the mock-ribbing.
– Bring every-other needle to position B across the whole needlebed or as desired. Cast-on using a cast-on comb with waste yarn. Knit several rows with the waste yarn. The last row (before starting knitting with main yarns) should be with either an unravel cord or any other easy-to-remove yarn.
– Reset the row counter to zero. Knit ten (or as many as desired) rows using yarn #1 (the backing yarn: in my case, the fuchsia colored yarn).
– Remove yarn #1 from the sinker plate (you can cut it or secure it behind the bed, out of the way) and thread a second yarn (from the side, yarn #2).
– Apply weights when needed on the edges to keep them neat and on the cast-on comb as well (which is especially needed for bulkier yarns).
– Knit 12 rows with yarn #2 (I knitted two more rows because my yarn #2 was thinner and also because I wanted the folded mock-ribbing to overhang a bit on the wrong side and not on the right side). I didn’t want any fuchsia color to show on the “right” side of the fold.
2. Folding the mock ribbing to create a rim for the cord (which we’ll add later).
– Remove side weights and remove the cast-on comb.
– Using a single-tip needle transfer tool, grab a yarn of the very first stitch on the first row knitted with yarn #2 and move it to the needle that is currently in position A. After the stitch is latched onto the needle, push this needle to the B position. Continue throughout the whole width of the knitted panel. At the end, you will have all needles in the B positions.
3. Preparing the front panel to knit cables.
– Hang the cast on comb on just-bolded mock-ribbing fold and add a weight onto it (to push the folded fabric a bit down so it does not get in the way of the carriage; without the weights, the folded fabric might jam the carriage).
– Loosen the tension a bit by 1-2 digits on the carriage dial (because now we have ALL needles in B position) and knit two rows with yarn #2 (the right-side yarn).
– Set the tension back to the optimum tension for yarn #2, and knit two more rows.
– Preparing for the mock-purl runners:
a) Starting with the needles in the center (closest to position “zero”), gently nudge the two needles on each side of it slightly forward. Perform this after every four needles. The stitches on the needles we slightly pushed forward will be transferred to the neighboring needles (and the freed needles will be pushed to A position). This empty space will create separation in the fabric, which will mimic the effect of purl-stitch runners around cables. Continue with this needle selection for the rest of the needle bed, including on the right-hand side. Your needles should be positioned as shown below. The first row is needles in position B; the second row is just slightly below position B. Note: on the very right-hand side edge of the needlebed, you will have 5 needles: 4 for a cable and one for the seam. On the left-hand side, you will have only four needles (we will not make a cable in the very left block of 4 needles).
b) Using a one-pring needle transfer tool, move the stitches from the needles we just slightly pushed forward onto the needles at the beginning of each 4-needle block (see the schematic below).
c) After the stitches are transferred, push the freed needle to A position. After you complete the needle transfer for all needles, your needle selection should look like the picture below. The empty spaces will create separation from the cables and 4-stitch stockinet blocks, acting at the same time like mock purl stitches. The contrasting backing will help with this effect.
– Knit two rows with yarn #2.
4. Making cables:
– Use two 2-prong transfer tools to switch two pairs of stitches to make a cable. Start with the first 4-needle block. It does not matter if you switch the stitches from left to right or from right to left. Just be consistent. After each swap of the stitches, move the needles to the E position (all the way out), which will be easier for your machine to handle.
– The second 4-needle block will be plan stockinet (not a cable), the third will be a cable, etc. So, you will have alternating 4-stitch stockinet runs with cable runs like those shown below in the photographs and in the schematics.
– After all cables are made, knit 6 rows with yarn #2 (“right” -side yarn), and then make cables again above those made in the previous section (starting with the first 4-needle block). Note: the first row right after the cables were knit will always be a bit tight. So, loosen the tension a bit (by 0.5-1), but then set the tension to the usual tension (after the first row).
– Knit repeating the cables every six rows until the desired length of the front panel is achieved. It is best (for a more pleasant visual appearance) to keep a 3:4 or 5:7 ratio between the width and the length of the blanket. So, when you make your swatch at the beginning of the project, calculate your final width and then figure out how many rows you’ll need to knit to achieve the desired length.
– After the desired length is achieved, move the needles that were in the A position into the working position B and knit two rows with yarn #2. Alternatively, if you prefer this second method better, prior to knitting the last two rows, make the stitches onto the needles that were in the A position all this time by pulling the walls of the neighboring stitches onto these needles.
5. Knitting a second mock-ribbing.
– Transfer every other stitch onto a neighboring needle and push the freed needle into A position. Do this for the whole width of the needlebed. You can use a one-prong tool or an adjustable 7-prong tool if making this blanket on a standard knitting machine (such a tool is not available for bulky machines unless it is custom-made).
– After this transfer, you will have only every other needle in B position. On every other needle, knit 12 rows with yarn #2 and 10 rows with yarn #1.
6. Folding the second mock ribbing.
– Remove all weights and a cast-on comb.
– Grab with 1-prong the stitch on the first row when we just started knitting on every other needle (the second mock-ribbing) and transfer it onto the needles in A position, while also bringing them into the B positions. It will create the fold.
– Attach the weights back on (I do it by hooking the cast-on comb onto the knitted panel and then attaching the weights to it; in this case, the weight is evenly distributed).
7. Knitting the backing.
-The yarn #1 should still be threaded through the sinker plate. So, continue to simple stockinet using yarn #1. Remember that the first row after we transferred all every-other-needle stitches might feel a bit tighter because now we have ALL needles in B position. So, you might want to loosen the tension by 1-2 for the first row. But then move it to the regular tension. In my case, yarn #1 was thicker than yarn #2, so I had to adjust the tension accordingly.
– Continue knitting stockinet until a desired length (AKA number of rows) is achieved. Don’t forget to rehang weights periodically.
8. Linking the panels together.
– Go to the mock-ribbing fold we made at the very beginning and remove the contrasting waste yarn (just one row we knitted at the end of the waste-yarn rows). Remove the waste yarn section.
– Find the last row of that mock ribbing that we knitted using yarn #1 and attach those stitches onto the needle bed onto every other needle. Take your time, and a nice seam will form. Continue for the rest of the bed.
– After all sitches are hooked onto the bed, attach a cast on comb (to push the folded fabric out of the carriage way) to the panel and weights and knit one row with yarn #1. Remove the cast-on comb.
9. Cast-off
– Use your favorite cast-off method to finish the panel and take it off the needles. The formed edge (seam) might seem a bit too thick if the blanket is made on the bulky knitting machine. So, as an option, link this edge/seam to the mock-ribbing fold to make it less obvious and to hide the linked seam of the fold.
10. Final steps.
– Link the sides together using a mattress stitch
– Knit two cords on the cord machine or on your own knitting machine (see here how to do it); insert them into the mock-ribbing folds.
Brother KH230 is a bulky-gauge (9 mm between the needles) knitting machine with 110 needles. It has only manual/basic stitch manipulation capabilities. Read about the pros and cons of this model in my Knitting Machine Encyclopedia. The rest of this post is dedicated to a specific machine serviced, cleaned, and tested in my shop.
I did the usual maintenance on this machine: removed, inspected, and cleaned all needles (some were rusty and I either replaced them or cleaned and polished them), replaced the sponge bar, and cleaned the machine inside and outside.
I also tested the machine on all needles to ensure that all needles form correct stitches and that the carriage moves freely across the needlebed. I tested several yarns on this machine (see the video): thick wool/acrylic blend (just a swatch with a blue yarn), 100% acrylic yarn (for hand knitting from KnitPicks, and acrylic/wool blend). The machine handled all yarns beautifully. I made a pink blanket on this machine while testing it. I did not experience any static but used the tension mast with a wax already attached to it.
The machine will come with all major accessories and most minor ones. A lot of accessories were missing, so I replaced them with new ones, new or old stock (some claw weights are new, needle selection tools/rules are new/old stock). The knit leader scales are new stock as well.
The case and the lid had several new plastic rivets missing, so I replaced them too (in case you notice them to be of a different color; not shown).
The toolbox is still very sturdy but is missing a lid. Other missing accessories are:
tapestry needle (any needle, even plastic, will do the job).
original two-sided hook; I included a plastic replacement (to be honest, I never even use those hooks; I prefer the latch hook).
oil bottle is not included; I use Hoppe’s gun oil from Amazon to lubricate the machine during kntiting.
unravel cord is also not included, but any silky and smooth yarn will do
The carriage is in good shape. There are very minor discoloration spots, but they are smooth to the touch, and I treated them with a special corrosion-stopping and preventing solution. During the tests, I did not experience any static (which sometimes happens due to the corrosion on the parts and carriage).
Now, about imperfections of this machine:
A hard copy of the manual is not included but pdf copy can be found online.
The carraige lock is original but has some discoloration.
You might notice that some of the needles are discolored. Those were polished and are smooth to touch. The discoloration is only cosmetic. All tets were performed with these needles.
The case has some very minor bumps and scuffs (only most major and most noticeable ones are shown below)
The lid has some as well (only most major ones shown below)
The row counter has some minor scratches but works just fine.
the cast-on combs have some minor dents but also work just fine. All tests on this machine were made with these cast-on combs. Cast-on combs for KH230 are very rare: they are shorter than the combs for the KH260 but longer that those for standard-gauge machines.
The toolbox comes without a lid. I covered it with plastic wrap for transport.
The tension mast is not original but rather a standard Brother tension mast (old stock). It fits almost all knitting machines, including electronic, including those that can knit with a Garter carriage (note the white holder-like addition on the mast – it is for the garter carriage sensor. It will not get in the way of knitting on this KH230). I am also going to leave the way sitting there. I used this mast setup during all tests.
the needle bed under the connecting screw on the left-hand side is indented. It still did not affect the functioning of the machine but keep that in mind and check and tighten that bolt often.
Despite all these imperfections, the machine is in overall great shape, and I had a lot of fun knitting on it. Keep in mind that it seems that there are a lot of imperfections, but I am just listing them all because I am thorough and because I want my customers to know in advance about these imperfections and how they affect the functioning of the machine. In fact, none of these mentioned above affected the knitting on this machine (with and without the ribber).
Brother KR230 ribbing attachment works with only one knitting machine: 9 mm -gauge (bulky) Brother KH230.
This post is dedicated to the KR230 ribber I refurbished in my shop.
To learn about the overall pros and cons of Brother KR230 ribbers, refer to my other blog post in my Knitting machine Encyclopedia.
The ribber came without a lot of accessories but I was able to collect most important ones.
Thus, all major accessories will be included with the ribber with the exception of:
yard tension stand: since the machine I tested did not have the original (to the KH230) tension rod but a generic Brother tension rod, the yarn tension stand was unnecessary. But if you are buying JUST the ribber from me, and your Brother KH230 has the original tension mast, contact me, and I might be able to source the original yarn tension stand for you. I am actually not quite sure why the ribber came with this special yarn tension stand – maybe to create a right angle for the tension mast because it is quite unique and is unlike any other Brother knitting machine tension masts.
cast on thread: any silky and strong yarn will work
case for the needles
Knit leader setting plates: the machine did not come with those. Typically, new knitters new to machine knitting rarely use the knit leader and as a result, these parts get misplaced. If you advance enough to use KH230/KR230 setup with knit leader, these setting plates are available online for a reasonable cost.
hard copy of the ribber will not be included, but it can be found online. Keep in mind that the manual is written pretty poorly with typos.
I cleaned the needle bed, and side brackets. I cleaned and inspected all needles individually. Needles in good condition but with some minor rust were polished until they are smooth to touch (however, some discoloration might still be visible but it does not affect the needle functioning). I inspected the carriage and the connecting arm thoroughly too and replaced some broken plastic parts in it.
I included a brand new retaining bar with a brand new sponge.
I am also including new table clamps for the ribber (not shown). All tests were done with these table clamps (incorrect table clamps can create an incorrect angle between the main and the ribber beds and cause misalignment and, as a result, missed/dropped stitches).
The cast on combs that came with the ribber are in great shape.
I also sourced out completely new setting plates for KR230. Notice that the setting plates are asymmetric, unlike settings plates for all other ribbers.
One feature that I like about the KR230 ribber is that there are markings on the needle bed for the working position (position B) of the needles.
I serviced and oiled the connecting arm to ensure that the wheel inside it moved freely as it is responsible for the indicator arros as well as for lifting the pressers to assist with pushing the stitches down.
To ensure all needles knit properly as well as other are no hidden problems, I knitted on 20-30 needles as well as on all neeldees using several different yarns: acrylic sport-weight yarn, double-thread worsted-thickness acrylic-wool blend yarn, and a mohair-blend with Lurex thread in it. The machine handled all the yarns like a champ!
These tests are shown in my video. Prior to the tests, I made sure the distance between the needlebeds was adjusted to the optimum to ensure no missing stitches during the cast one and further one.
Below are the finished projects made from the panels knitted on Brother KH230/KR230 setup using the two out of three yarns I mentioned above.
Let me know what you think.
The ribber does not come with its original packaging. It will very likely be shipped in two different packages – long one for the needle bed and a smaller one (in size) for all other parts.
takes a variety of yarns (thickness- and texture-wise)
comes with all major accessories
CONS:
some minor accessories are missing (see above); however, their absence does not affect the functioning of the ribber.
The part of the side bracket that gets inserted into the machine on the left-hand side was a bit bent and I straightened it. (The top surface of that section has scratches as a result of my strainitening it). The series of pictures below shows that bracket and that area from different angles. Again, it did not affect setting up the machine but the bracket needs to be pushed in with a bit more force than the other one. Just something to keep in mind when connecting the ribber to the main bed.
As you can see, I invested a lot of both time and money into this ribber to ensure it has all accessories and that it functions well before I pass it on to other knitting machine enthusiasts.
This Brother KR830 ribber was prepared (cleaned, serviced, and tested) in January 2025. This post is dedicated to this specific ribber. Refer to my Knitting Machine Encyclopedia to learn the pros and cons of Brother KR830 ribbers.
The ribber did not come with a carriage. Thus, I used a carriage from my stash. However, the carriage is from Brother KR850 ribbing attachment (which is a bit more advanced – read here): you can see “lili” buttons on the carriage picture, which are specific to KR850 ribbers only.
However, as shown in my video, KR830 needle bed, KR830 sinker plate, and KR850 carriage worked well in tandem with my Brother KH940 knitting machine. In fact, the carriage slides easily even with the yarn fed through it (as also demonstrated in my video).
Despite being not for the KR830 machine, the carriage works great and is in great shape. All levers, knobs and buttons move on both sides of the carriage.
The ribber came without some other accessories. I put together a set of accessories. All major accessories will be included.
The original cardboard box will not be included. Regardless, the machine will be packed for shipping really well.
The table clamps are exactly those used during the tests. So the angle between the ribber bed and the main bed will be the same. The needle selection ruler is new stock as well.
The aluminum claw weights are new. The rack lever is new (thus, it is lighter in color than all other plastic components).
The hard copy of the manual for the Brother KR830 will be included as well.
I cleaned the ribber, thoroughly oiled it, and removed old grease. I inspected all needles (individually and then by knitting on the full bed) and replaced the bent and faulty ones with the needles from a new stock.
I dedicated a lot of time to adjusting the distance between the main bed and the ribber. It is one of the most important parameters during knitting.
Knitting on a machine attached to a ribber is often an interplay between the yarn the knitter is using, tension, and the angle between the ribber and the main bed. The distance was adjusted for the thin yarn (boucle) and slightly thicker than the sock-yarn-thickness yarn (see my video).
During the tests, while the tension was chosen too loose for my first yarn, I was losing stitches (shown in my video – see a clip starting at 2 min 30 s). But as I adjusted the tension, the knitting became flawless.
I knitted on the full bed to demonstrate that all needles form nice stitches. If the latches did not work well or if the needles were bent, it would manifest itself as tucked or missed stitches.
Typically, it is challenging to need a full ribbing on the full bed (All needles are in working positions). Thus, I chose an every-other needle ribbing pattern and knitted on two different sets of every other needle.
I would not recommend beginners to start knitting on the full bed since there are several challenges associated with it:
hard to insert the side hanging weights when all (or almost all) needles are in their working positions (you can see of bit of this struggle in the video);
the knitter needs to pay especially more attention to the carriage position on the edges of the needle bed and to the yarn tension to avoid side floaters (I experienced them – see my video)
Pattern one (see video) had three needles NOT selected on the ribbing attachment. It used slightly thicker yarn. Pattern two had two needles not selected on the left-hand side of the ribber bed. I used thinner but boucle yarn. Both yarns produced wonderful fabrics. I made two great hats out of the knitted panels.
Imperfections:
1. The main bed has two minor rust spots underneath that I covered with the rust-stopping liquid. It is not pretty but at least it prevents further corrosion.
2. The cast-on combs, both small and long, had rust spots that I also covered with Rustoleum. I know it does not look pretty after i applied to liquid but it stops further corrosion. I did not have problems with the yarn catching on the rust spots. These are mostly cosmetic defects.
One cast-on comb side has more spots than the other (on both combs).
The yarn holder looks a bit rusted too but is relatively smooth to touch:
The plastic fine knitting bar is packed inside the ribber itself:
BTW, the hats were donated to a woman, who hand-embroiders the textiles ( as a hobby) and then donated to the women who lost hair due to the alopecia.
Overall, I am very pleased with the performance of this ribbing attachment. Hoping you will be too!