Brother KX350 knitting machine

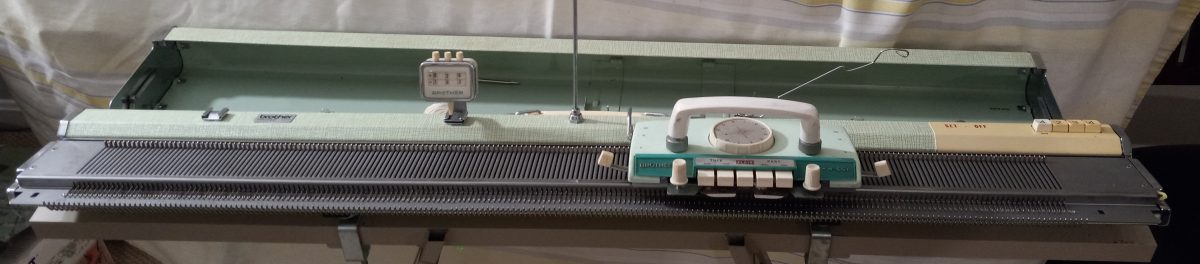
Brother KX350 knitting machine is a plastic flat needlebed machine with 130 needles, positioned 7 mm apart. The article below is dedicated to the machine I serviced and tested in January 2024. If you want to know the pros and cons of the Brother KX350 knitting machine mode, read my Knitting Machine Encyclopedia.

On this machine, I cleaned and inspected all needles. I cleaned the needle bed and the carriage. I inserted a new needle-retaining sponge.

The machine will come with all assesories shown in the manual.

The tapestry needle will be plastic. The oil in the bottle that came with this machine still looks good (transparent and not yellow), so it will be included as well but there is only half a bottle left. I recommend purchasing Hoppe’s Elite Gun Oil

However, the hard copy of the manual will not be included but it is available online for free.

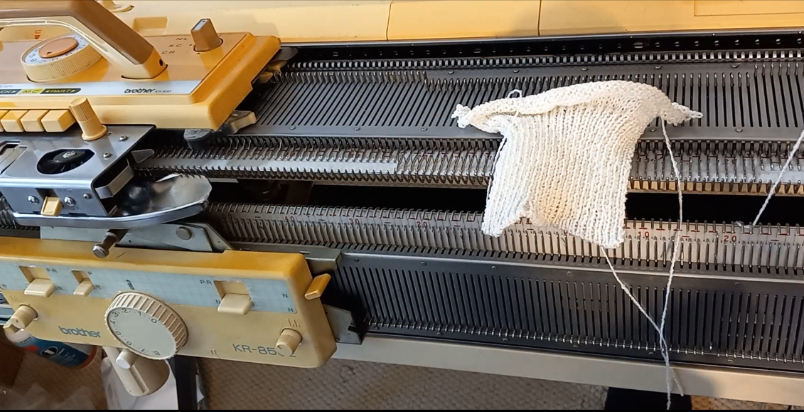
To ensure that all functions of the carriage work well, I first knitted a swatch (with a pretty thick yarn – two strands of 50 g/150 m (1.76 oz/109 yards) per skein- all went well (watch the vidhttps://youtu.be/ANFTFSCiwqseo).

After a successful swatch (knitted with a relatively thick yarn), I proceeded (with the same yarn) on a full bed (all needles) to test whether all needles formed nice stitches without unprompted tucking. All tests went well – watch a video of my tests.

All levers, knobs, and buttons move freely on the carriage (it is demonstrated in my full video). I also knitted using the HOLD and PART functions of the carriage.

When I test my machines, I like to learn something new in terms of knitting, come up with a new design or test a new feature of the machine.

So, this time, I came up with my own pattern for a large dog sweater and I knitted it. I used the partial knitting function, HOLD position functions, mock ribbing, and cast-off. The picture below shows my (unfortunately, unhappy) model who will be wearing her new sweater. There are a couple of design flaws that I will be improving but while the next beta version is in progress, this one will keep my dog belly warm. Check out this booklet for lots of other patterns possible to make on this machine.

A couple of imperfections of this machine:

There are really no flaws. However, I wanted to mention that no original box came with this machine but it will come well-packed for shipping.

No hard copy of the manual is a bummer but this machine is easy to use and straightforward and with the hints provided by the manual online, new knitters should have no problems starting using KX350.

Overall, Brother KX350 is not only a perfect machine for beginning machine knitters, but for experienced knitters too: KX350 takes thick yarn and can be a quick tool to test a pattern (like I did with the dog sweater).

The difference between Brother KH965e, KH965i and KH965.

Just a quick note on the differences between Brother knitting machines under the model numbers KH965, KH965e, and KH965i. The reason there is a lot of discrepancies and misunderstandings about the additional “i” in the model number is that these machines are very scarce and because the functionality seems to be . They are very desirable and those that are still available on the used market are still in great shape.

First, about “e” :

Even if Brother KH965e indeed exists, it would simply mean an anniversary edition since “e” stands for “eleganza” (the latest anniversary edition model to the best of my knowledge is KH950E). This machine would be identical to the functionality of the KH965 knitting machine but the color combination of the carriage, end caps, and control panel might be different (like in the case of KH930/930e and KR850/850e setups). However, I’ve seen only the KH260/KH260e, KR850/850e and KH930/KH930e combinations. Brother KH965 was released to the market significantly later (by about 5 years), so there will be no even for an “anniversary edition”. If you’ve seen the KH965e model and want to prove me wrong, shoot me a message.

Now about “i”:

The differences between the KH965 and KH965i models of electronic brother knitting machines are subtle and might vary depending on which market the machine was made for.

Some think that “i” in KH965i stands for “intarsia”. However, both KH965 and KH965i have built-in intarsia knitting capabilities according to the instructions (as well as their a bit older analogs, KH930 and KH940).

I researched pictures of a lot of pictures of various KH965(i) machines and all of them have the intarsia option. … which kind of makes sense because KH965(i) is an updated version of KH930/KH940, which also had this option.

Some think that “i” might stand for is “interactive” or “interface” and the difference is that KH965i has a compartment to insert the PPD disk, however, KH965 has the same disk port (and the manuals for these machines both mention the compartment and disk port). So, basically, KH965i can accept files from external sources without any modifications to the machine.

Knitters who prefer a more advanced way or pattern transfer use a special cable instead of the PPD disk. This cable is inserted into the slot for the disk for file transfer through special software.

The KH965i model has also the capability of inserting the cable into the machine itself (originally assumed to be for the FB 100 disk drive and file transfer). And this is one of the main differences between KH965 and KH965i.

Another critical difference is the settings on the selection dial on the carriage. Brother KH965 does not have a KCII setting…

…unlike Brother KH965i.

However, KH965 released to the Japanese markets (Topical-5) noticeably has also 4 positions on the selection dial, which probably implies KCI and KCII settings (Sorry – I would be more sure but I don’t read Japanese).

Thus, it seems that even if your KH965 does not have “i” next to its name, it might still have functionalities of the KH965i machine.

Thus, to identify whether you have a KH965 or KH965i, look for:

  • KCII option on the selection cam on the carriage (or four different options on that dial)
  • A port on the back panel of the machine.

All other functionalities of the KH965 and KH965i are the same (namely, memory, functions of the buttons on the panel, etc).

I really hope you are a lucky knitter who has Brother KH965(i) in their collection!

Unpacking instructions for my customers

All machines and large accessories (ribbers, color changers, carriages, and knit leaders) are shipped insured. I take very detailed pictures while I pack for insurance purposes. Often, shipping companies like to blame packers for the damage they cause saying that the damage occurred due to insufficient packaging material used.

Well, I shipped several dozen machines and I know how to pack them well. However, damage still happens because machines and ribbers are heavy and the package can be dropped.

Therefore, when you sign off on your package or the package shows up at your door, please, take a picture of how it was delivered. Then inspect the package and take pictures, especially if you see some dents, large scratches, rips, or holes on the outside of the package. If you don’t see any signs of damage on the box itself, please take a general shot picture preferably from 4 different angles.

While unpacking the machine, please, take pictures as well. If you see obvious signs of damage, take pictures of that place from several angles.

You do not need to send me the pictures right away. Wait until you check if the machine is working or not, unless the damage is obvious or structural.

Please, do not discard the packaging materials and the box until the operation of the machine is fully confirmed (just in case something needs to be sent back, etc.), or until we sort out the insurance claim in the case of the damage.

These are all the precautions we need to take in case we’ll need to file an insurance claim. They are very picky.

In most cases, everything gets delivered fine because I pack my machines really well. Ribbers are especially robust than some others during travels.

Please fill out the form below to acknowledge that you understand these instructions and will follow them. Please, write “I read the instructions and I understand them,” followed up with your name.

Go back

Your message has been sent

Warning

Brother KH551 knitting machine serviced in November 2023

Brother KH551 is a standard gauge knitting machine with 4-pushbutton-based patterning mechanism. This blog is dedicated to one specific machine I serviced. If you want to know more about the Brother KH551 knitting machine model, refer to my Knitting Machine Encyclopedia article.

The machine (including carriage and all needles) was cleaned and serviced. All levers and the buttons on the carriage were checked and they moved and worked without problems. These levers were also tested while knitting. All needles were also checked while knitting on a full bed. No faulty needles were detected.

The 15 needles on each side (30 total) came from my refurbished stack. Thus, when I was knitting on the full bed, I was inspecting the edges especially closely to make sure all these refurbished needles worked well. Also, because of such a high number of refurbished needles, I am including the set of 5 spare needles (instead of usual 3).

The machine comes with all major assesories.

Several missing minor assesories are:

  • A hard copy of the manual is not included but can be found online.
  • Sinker plate yarn hangers, left and right. It can honestly be replaced with a regular paper clip (just unbent them to a desired shape). The manual describes their usage on p. 18. manual
  • The tool storage box is not included
  • Oil is not included also but I recommend Hoppe’s Elite Gun Oil.

Additionally, the small cast-on comb is not all metal – I pulled it out from my own stash.

On the full bed, I knitted stockinet, tuck, slip and hold patterns (see the video of tests – all went well). Butterfly stitch is my favorite on this machine.

Now about flaws and imperfections:

I had to replace the push-buttons but I did not have a part for the button marked #1. So, I replaced it with the button marked as #4 but it is of different shade of white. If you want, you can put a sticker on it with “#1” (I prefer not to put stickers on machines since it damages and stains the vintage plastic).

Despite being vintage, this machine will still serve your craft needs for many years especially if regularly serviced.

Happy Knitting!

First steps of testing new-to-you ribber.

If you just purchased or snatched a ribbing attachment to your knitting machine, I can imagine how happy you are!

If your ribber came to you fully serviced and tested, you still need to learn yourself how to use it and attach to you machine. So, follow the steps below. However, if your ribber came to you AS IS, follow the steps outlined in my other article on how to clean and service it before you start the knitting tests.

  1. The first most important step is attaching your ribber to the main knitting machine bed. Your ribber manual is the best source for this. If you are a visual learner, there are plenty of youtube video on how to do it for your particular ribber.
  2. Before you even attach the ribber carriage, main carriage and the connecting arm together, you ABSOLUTELY have to make sure the distance between the main and ribber bed is the optimum. Too wide or too narrow distance between the beds will cause all kinds of problems: yarn is not latching onto the needles, resulting in dropped stitches, grinding noise, difficulties to move the carriage, bent latches, etc. for Brother knitting machines, the best manual that explains how to do it is for the Brother KR810 ribber (available online, just Google it). There are also a lot of YouTube resources on how to establish the optimum distance.
  3. Check all magnets on connecting arm and carriages to make sure nothing got stuck to them.
  4. Once you are satisfied with the distance, make sure the connecting arm is attached to the main carriage properly. (Poorly attached connecting arm will manifest itself in dropped stitches, grinding noise, difficulties in moving in one or both directions, damaged needles or needle latches). Follow manual instructions to the dot. Once you attached the connecting arm to the main carriage, run through the needles (no yarn) to make sure nothing is touching the connecting arm. Start with 20-30 needles and if everything is good, add another portion of 20-30 needles, and so on.
  5. Attach the ribber carriage (unless you have a vintage, earlier model, of ribber, in which case you don’t need to do that) to the connecting arm/main carriage assembly. Again, follow instruction to the dot. Then run again the carriage assembly through just the ribber needles. For this purpose, only bring 20-30 needles to working position and run the carriages through. If everything seems smooth, add another section of 20-30 needles, and so on.
  6. Start knitting on a small swatch. Start with 1×1 rib on every other needle. (When setting up the ribber and knitting the first cast-on rows, it is extremely important to move the needles to the B working position as close as possible. Otherwise the carriage might bend the latches.) Use very thin yarn at first. Preferably the yarn that is no prone to static. (Quick side note on how to check the static of the yarn: bring a small strand of yarn to the crack between the beds and if the yarn sticks to one of the beds, yep, you probably have static. Change the yarn or apply wax). Do not use cotton yarns. Thin smooth acrylic yarn should work. Starting with the very thin and smooth yarn will prevent you from having problems related to JUST yarn: static, tension, friction if yarn has texture. (Please, do not think that knitting swatch is a waste of your yarn or time. There are several learning opportunities. For example, you will also learn how to choose the right tension for the yarn you chose, practice transferring the stitches (by hand or using a transfer carriage), whether there is static with this yarn, etc.) Follow the cast-on and knit instructions to the dot. Knitting just a small swatch will let you 1) check whether all buttons and functions move freely on the ribber carriage and 2) master the cast-on procedure.
  7. Knit on a full bed using the yarn you had success on with the swatch. Start with the 1×1 rib on every other needle. I do not recommend knitting on ALL needles on the ribber – leave 1-3 on each end in non-working position. It will be easier to attach wire-weight-hangers and will also ensure you all stitches are knitted before the carriages returns in the opposite direction. Knitting on the full bed will show you whether all needles function well (If a needle is bend, misaligned, or has a sticky latch, stitches will not form properly. You might also see dropped stitches, tucked-stitches or lots of pull stitches. ) And also discover (if any) additional problems with the setup. (All minor problems not seeing while knitting the swatch might manifest in a full bed in a more pronounced way). The panels knitted on the full bed during your tests can be converted to hats (knit 100-120 rows for one-layered hat with a brim and 200+ rows for a double-layered hat). During your tests on a full bed you’ll also learn how to hang and rehang the wire-hangers with weights to ensure nice edges, how to recognize dropped stitches, how to catch dropped stitches on the very ends of the panel and what to do to prevent them, etc. Knitting on a full bed when you are just starting is a whole new game.

Let me know how the first test went!

Steps I take when cleaning and servicing ribbers

.. this article is a constant work in progress as I collect more information and personal experience…

… Please, read the whole article first before proceeding.

First cleaning steps:

  1. Check against the manual if all parts are present. (If your ribber did not come with a hard copy of the manual, google its model number and you will find free pdf file of the manual). The most critical ones are carriage, side brackets, connecting arm, at least one cast-on comb with a wire, setting plates, weights and table clamps. If others are missing, you can probably manage to knit without them. If something is missing, search on the Internet to purchase them and while they are arriving, work on the steps below.
  2. Clean/wipe the visible dirt from all parts.
  3. Remove all needles, clean/wipe them and inspect. I visually inspect if there is deep rust (if there is just shallow rust – I gently polish the needles with fine sand-paper), obvious bends.
  4. Vacuum from underneath of the ribber bed and from the top (simply run the narrowest attachment your vacuum have over the needle bed).
  5. If you have a brush with long wire, insert it into the slot for the retaining bar and move it back and forth, in and out. Vacuum again. Repeat several times until you see no more lint/dirt coming out.
  6. Inspect the metal parts of the needle bed as well as connecting arm and carriage (especially from underneath) for any major or minor rust. Major rust – medium size to large orange spots. Minor rust – series of small to medium sized black-ish dots. Read a separate article on my recommendation on how to deal with rust.
  7. Insert the needles back in. While doing it, check if the latches move freely. Insert the retaining bar. It goes on top of the needles. For Brother ribbers, the groove of the plastic retaining bar should be facing you. When all needles are inserted, look if the distances between the needles are even. If not, you might have a bend needles you did not catch.

If all parts are present, you are now ready to start your first tests. They are outlined in my other article.

If you are passing this ribber to somebody else, repeat the wiping, vacuuming and visual needle inspection again.

Brother KR850e ribber serviced and tested in January 2024

The article below is dedicated to the ribber refurbished for a customer in January 2024. For specifics of Brother KR850 ribbing attachments, read my KM Encyclopedia.

Brother KR850e, tested and serviced in January 2024, underwent all my usual tests: inspecting all needles, cleaning the bed and tools from old grease and lint and testing on all needles (made two hats while doing it – read below). Read in detail the typical steps I undertake while servicing the ribbers. Also, check out the tips on the first tests for your new ribber.

The setup includes all assesories mentioned in the manual. The hard copy of the manual is included as well. The machine will also come with its original box and Styrofoam pads.

Although the Styrofoam linings have seen better days and are a bit dusty but still service it protective purpose.

The functioning of the carriage was checked by knitting a 1×1 rib swatch on just 20-30 needles and on a full bed (all needles with the exception of 2 and 3 needles on each side for the ease of knitting). These tests were performed with 3 different yarns: thicker acrylic with some polyester (not as stretchy), thin wool-containing (wool is sometimes staticky) and thin 100 acrylic yarn (probably most stretchy out of the latter two). Watch the full video of theses tests in my YouTube channel.

All needles were inspected very thoroughly before and after all the tests to ensure no bent ones and no sticky latches.

Even on a full bed, the carriage-setup (ribbing carriage, connecting arm and a main carriage) was very easy to move – watch the video: I could move it with just one hand. (but of course it is always a combination of yarn, tension and potential static)

Both swatch knitting and knitting on a full bed (1×1 rib, in two different needle configurations to ensure all needles got tested) showed excellent performance from the ribber and not flawed stitches.

Below are the items I knitted while testing this ribber. They are going to the local charity.

Now about the imperfections and minor flaws of this ribber:

1. Couple of large barrel weights have small cracks.

2. Some of the tools (especially with plastic components) have visible scratches (too many to list here).

3. Cast-on combs have some minor rusty spots (even my brand new (but old stock) cast-on combs have some black rust spots. Probably due to age.) I covered the spots with corrosion stopping oil, which offers temporarily protection from further rust. Despite these cosmetic imperfections, the combs are smooth and function well: the yarn did not snag on them.

4. Connecting arm has some minor rust spots as well (they might not show well on the pictures below because they are very small).

5. The carriage has some minor rust spots too as well las some minor scuffs. But under-carriages looks very nice. Plastic components of the bed and the ribber itself show typical yellowing/aging from the exposure to the sun light.

The ribber worked well even with these rust spots, so I do not anticipate any future issues. Honestly, almost all ribbers that come to my possession have some sort of rust issues. Since the quality of the metal on the parts for the vintage machines is much better than the quality of the metal on the parts for modern machines (Chinese knock-offs/copies), my strong preference still goes to the vintage parts (even with minor rust) than to more modern new/old stock parts. Also, extensive polishing/rubbing (with the goal to remove rust completely) damages surrounding yet-uncorroded surfaces, making them prone to corrosion. So, if i do not see a lot of issues with the moving levers and knobs as well as with static (or static is manageable), I only gently polish the rust and cover it with protective oil. More tips on rust are in my other article.

Bottom line: since the sinker plate and the carriage did not have any issues, I did not replace them. With Regular oiling and wiping and storage in dry place, these parts will serve you a very long life. I did not have any issues with the static as well but I did have a wax in my tension mast just to make sure because of the dry season and because my shop is right by the fire place room (dry air causes more static).

Despite all these flaws, the ribber worked well. I used all the assesories and tools that will be included with this ribber.

Happy knitting! Do not forget to use the tips on how to learn to operate new-to-you ribber to avoid frustration and damage to new-to-you ribber.

How to deal with rust in knitting machines.

… this article is a constant work in progress as I collect more information and hands-on experience…

…. Please, read the whole article first before proceeding.

Problems with rust in or on your knitting machine can manifest themselves as stuck levers and knobs, metallic/grinding sound when moving parts, sometimes static and jerky movements of the parts. Rust is sometimes visible and obvious and sometimes not (because it is hidden inside the carriage or needle bed or is at hard-to-get angles/corners of the machine).

Major rust: medium to large size rust spots.

If your hole needle bed is covered with orange rust, your machine it is probably a lost cause. If you hate waste and like projects, you can still attempt to disassemble and polish all parts (with sand paper and metal brushes) and cover the surfaces with oil or even a thin layer of rust-oleum.

If this project fails or you don’t finish it (or get confused how to put it together), you will probably have a lot of spare parts for your other machines or to pass along to the knitting machine community. AND, you’ll learn a lot about internal intricacies of a knitting machine. Still a win-win.

I managed to remove rust from a vintage machine, where the whole needlebed was covered with orange rust but I was lucky enough that there was no corrosion in the needle groves. It did required a lot of notes taking since the available-on-the-market service manuals are of poorly quality and I was almost on my own in disassembling and assembling it back on. But even with note taking, there were confusing parts on how to do certain things but I managed to get this machine to work pretty well.

If you see individual orange rust spots and they are easy-to-get to, first wipe them (vigorously) with the oiled rug and see how much of this rust will simply come off. Often, a lot of comes off and no harsh scrubbing is necessarily.

If you feel that more scrubbing is needed, start with rough plastic brushes and if still lots of rust remain, use fine sand paper and/or metal brushes to reach harder-to-get places.

If the surface you just polished from rust does not come in contact with any other moving parts, feel free to cover the polished surfaces with rust-oleum. I do that if I see rust on lids, underneath the needle bed, on punchcard readers panels (only on surfaces that are supporting the mechanism).

If polished parts do come in touch with other parts, just apply protective oil.

Minor to Medium rust

A lot of machines come to me with some blackish, grayish and even whitish discoloration (often in the form of bunch of very small spot group together), like acne on the needlebed, retaining springs, punchcard mechanism, lids and cases.

This is not the most aggressive form of rust but if left untreated/unnoticed, might still cause issues.

Thus, when the machine came to you needing some TLC, wipe it first with a rug (aggressively but its just a rug – no damage will occur to the metal itself). If the surface feels smooth to your hand, just cover it with oil (Gun oil, UPS oil or other corrosion protection oil friendly to knitting machines). If the surface still feels rough, polish with fine sand paper (if the surface is easy to reach and is flat enough) or a rigid plastic brush to remove additional rust layers. Again, apply a very thin layer of protective oil.

I once had a carriage with white-ish discoloration on its metal part (a very vintage machine). It might have been a vintage form of steel (who knows), but since then I did not see any more the same type of metal damage (aka rust). The carriage needed a bit of TLC and “hand-holding” while knitting and daily oiling. With these preventive measures, it knitted wonderfully. Without them – a lots of static accumulated and lots of grinding noise was coming after several rows of knitting.

The bottom line is:

A lot of ribbers and machines come to my possession with some sort of rust issues. Since the quality of the metal on the parts for the vintage machines is much better than the quality of the metal on the parts for modern machines (Chinese knock-offs/copies), my strong preference still goes to the vintage parts (even with minor rust) than to more modern new/old stock parts. Additionally, it is often simply impossible to find parts on the new market. Also, extensive polishing/rubbing (with the goal to remove rust completely) damages surrounding yet-uncorroded surfaces, making them prone to corrosion. So, if i do not see a lot of issues with the moving levers and knobs as well as with static (or static is manageable), I only gently polish the rust and cover it with protective oil.

…. more coming as I learn more about these mighty machines and their intricacies.

Problems with ribbers and how to avoid/fix them.

…this post is a constant work in progress. But i hope several solutions/problems outline in here are still useful.

The most important aspect of attaching the ribber to your knitting machine is the distance between the two beds. Incorrect distance between the ribber and the main bed can manifest themselves as:

  1. dropped stitches
  2. poorly formed stitches
  3. grinding noise (which can be heard only when moving the carriage from one side and not the other way)

Thus, spend a decent time learning how to setup the correct distance before attempting to knit. There is a separate article on how to setup Brother ribbers as well as Studio/Silver Reed/Singer ribbers. There are a lot of online resources how to do it as well.

The second most important aspect is to correctly attach the connecting arm. Incorrectly attached connecting arm to the ribber can manifest itself as:

  1. grinding noise
  2. lots of damaged needles or bent latches
  3. poorly formed or dropped stitches

Some older models do not have such a connecting arm, which makes this step redundant but then the knitter needs to move the two carriages separately, one after another.

There is a separate article on how to attach the connecting arm for Brother as well as Singer/Silver Reed/Studio knitting machines. There are a lot of online (including video) resources as well.

There are several other problems, such as:

  • statis