
Brother KR321 ribbing attachment complements vintage manual/basic and four-pushbutton Brother knitting machines. Read more about this model in my Knitting machine Encyclopedia. The post below is dedicated to a specific ribber serviced in my shop in February 2026.
The ribber is in very good shape. However, I still cleaned it, inspected the needles, serviced, oiled and cleaned the carriage. The sponge in the retaining bar was replaced. The metal retaining bar is original.
The ribber is very easy to install/attach. It is easy to maintain distance between the ribber and the machine (which is important).
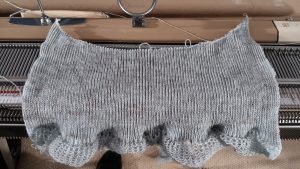
To test the ribber, carriage functions, and to check if all needles form correct stitches, I knitted on the full bed. All this is documented in this video. All needles formed correct stitches. I knitted on two sets of every-other needle to check that. The machine knits beautiful ribbing. Please be mindful when choosing thicker yarns or textured yarns. I will include a partial cone with yarn that I used in my tests (the dark green yarn),
I spent quite a lot of time familiarizing myself with this ribber and learning about it. I followed the manual for the original cast-on instructions. They are shown in this video. This original method recommends suspending the cast-on comb on the needlebed before the first row is knit. However, the cast-on can be hung after as well (similar to just the usual knitting).
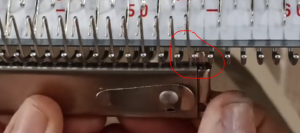
However, I quickly discovered that the original wire hangers do not attach well when too many needles are used for knitting. Thus, I am including the wire-hangers from KR830 with smaller ends to get through the free section between the ribber and the main bed. The small barrel weights (also from KR830) seem to be a better fit than all weights included with the standard setup, so I am including those as well.
I also think, if not absolutely necessary, it is better to knit, leaving 5-6 needles on each side in a non-working position. In this case, it is easier to insert the side weights (on wire-hangers), to distribute weight evenly on the cast-on comb and to better see if the cast-on comb and other weights are not getting caught on something.
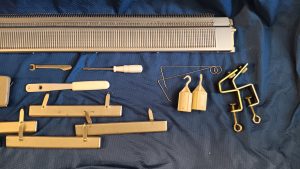
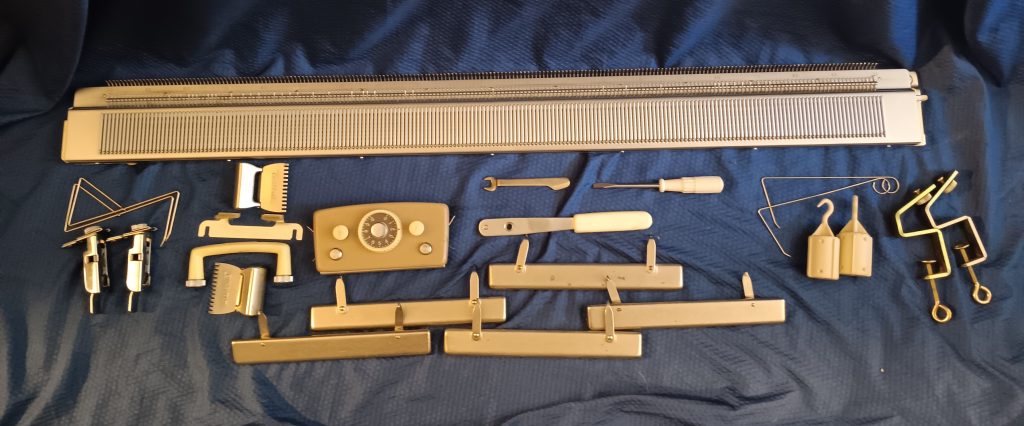
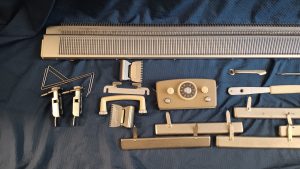
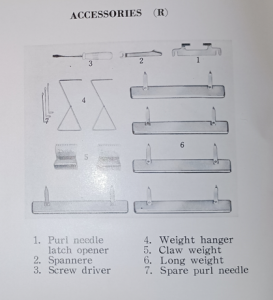
The ribber will come with all its “official” accessories, according to the manual. The setup comes with a generous number of replacement needles.
I am including additional accessories: barrel weights, wire-hangers with a round end, and table clamps with a less sharp S-angle. I’ll also include remaining strip for the sponge bar (please, keep it in a dark place away from fumes and light to extend its longevity).
Imperfections:
- Retaining bar with a fresh sponge strip is a bit hard to insert and remove (see below).
- couple of the bar-weights that came with the ribber have minor rust spots on them
- Carriage knobs have tiny cracks. I super-glued the most cracked, and it holds well. It did not affect the knitting and the knobs move up and down well.

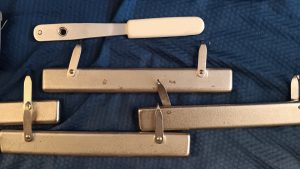
- I am not sure what the original design of the handle is supposed to look like, but this metal feature on the handle protrudes a bit.

- Well, talking about the handle: it is not critical, but screw it on evenly: a little bit on one side, then a bit on the other, so it goes on evenly.
Several more words of wisdom and things to pay attention to:
- when assembling and disassembling the sinker plate to remove or accommodate the brush-arm assembly, pay attention to how the brush arm assembly goes in. It has the yarn guide, which is important for correctly forming the stitches. It might touch the pegs if incorrectly set up or cause problems when knitting tuck.
- If you need to remove it to replace the needle, stick a pencil (with an eraser on its end) into the retaining-bar channel and gently hammer on it until the other end of the retaining bar shows on another end. Then grab pliers and remove it. I noticed that with time (for those couple of weeks I was testing the ribber), it became easier as the sponge was probably being compressed a bit). I tried to use different kinds of retaining bars: plastic ones like in later models, but they did not hold the needle,s and they were not even staying in the working position (sliding back). And I could not find any other narrow enough spongy material to fit.
- If you feel that the arm-brush assembly is touching the ribber needles, pull the arm a bit towards you and then fasten the oyster clamps.
- When knitting a small section on the ribber, using the original setup is ok (I did not encounter any dropped stitches when knitted swatches). However, for wide panels, I strongly suspect you will need the “new” table brackets. Those gave me the most reliable weight across the comb and no dropped stitches.
- be patient and learn one technique at a time, do not start complex projects until feeling confident with less sophisticated ones. Ribbers, in general, are honestly a pain in the butt: so many (additional) things to keep track of.
One thought on “Brother KR321 ribber tested in my shop on Brother KH521 knitting machine”