Knitting a cowl/neck warmer/hat/beret on any flat-bed knitting machine.

I knitted several variations of these cowls/neck-warmers. In fact, this is my favorite project to do while I am testing knitting machines. The reasons are:

  • This project is done on a full bed, thus, I am checking whether all needles function and knit properly.
  • This project can be done on any-gauge flat-bed knitting machine (mid, standard or bulky gauge) with or without patterning capabilities. Just choose the correct yarn for your gauge.
  • No need to count your rows and stitches to calculate gauge, and no worries about changing tensions
  • While knitting this hat, you will learn about the appropriate tension for the yarn I chose and how your machine will handle different yarns. I start with knitting on every other needle which is easier on the carriage if the yarn is too thick (thus, if you are experiencing problems with knitting on every-other-needle, that means the yarn is definitely too thick).
  • It is a very easy project and fun. You will not only know you knitting machine better but in the process, you will make something wearable either for yourself, your friends, and relatives or for charity.

While working on this project you will learn how to 1) cast on with waste yarn, 2) create mock-ribbing, 3) fold the knitted fabric over, 4) cast off, 5) knit a cord and 6) make a buttonhole. You will need to know the basic stitches of sewing knitted fabric, like back-stitch, and mattress stitch, and, what yarn is good for you machine.

Below are the instructions on how I knitted the cowl/neck warmer/hood/hat below.

If some steps are unclear, refer to the video tutorial I created. These steps were performed on the Brother machine. Thus, some steps are specific to Brother machines only (like cast-on combs and the part button) but if you already know how to start knitting without the cast-on comb and how to make your machine knit in partial mode in one way, you can easily adjust those instructions below.

Additionally, the project I describe below was made on the standard-gauge knitting machine.

Step 1: Cast-on and knitting mock-ribbing.

  1. With your 1×1 needle selection ruler, bring every-other-needle to the working position (typically B-position).
  2. Run the carriage from right to left and back to even out all needles.
  3. Rezero the row counter.
  4. Thread the waste yarn into the carriage and knit one row.
  5. Hang the cast-on comb
  6. Knit several rows until you are sure all stitches are established well.
  7. Knit one row of contrasting strong yarn or with an unravel cord.
  8. Rezero the row counter again.
  9. Thread the main yarn into the carriage. Hang an optional barrel weight onto the middle of the cast-on comb.
  10. Knit 10 rows.
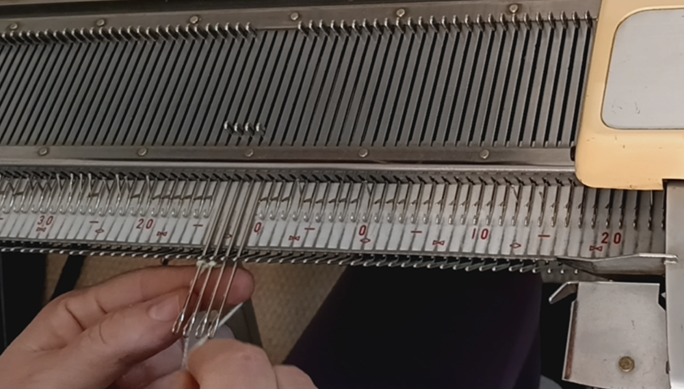
  11. Make a buttonhole. We will use it to insert the cord into the folded mock-ribbing. For this purpose, remove the stitch closest to the zero-position and put it onto the next needle in working positions. Move the just-emptied needle back to the B-position (standard working position).
  12. Knit 10 more rows.
  13. Fold the mock-ribbing. First, remove the cast-on comb. Then, using a one-eyelet tool, transfer the stitches that are right above the contrasting yarn (remember – the one row we knitted in sub-step 7 above?) onto the needles in non-working positions. Watch this step in the video at approximately 3 min 25 s position. After the stitches were transferred, make sure the needle is in the B-position. Continue for the rest of the fabric.
Grab the stitch right above the contrasting yarn….

…and put it on to empty the needle (in A, non-working, position) on the right.
Then push it to the B position.

Step 2: Knitting the main section

  1. Optional: After the mock ribbing was folded, attach the cast-on comb to the section knitted with waste yarn. Increase the tension dial number by 1-3 numbers and knit one row. Because we just went from knitting on every-other-needle to knitting on all needles, it might be too tight to knit this very first row on the full bed. This is what we are loosening the yarn tension.
  2. Knit 80 rows. (In my demo, I knitted simple stockinet stitch. But you can knit any pattern you desire.) It is about 7-8 inches of the knitted fabric. If you want to make a longer cowl/neck-warmer, or a deeper bonnett, knit more rows. Also, if knitting on a bulky or mid-gauge machine, you might need fewer rows. 7-8 inches of the knitted fabric is a good approximation to get a good size cowl/neck warmer/hat/hood.

Step 3: Second mock-ribbing

  1. Using a one-eyelet tool, transfer the stitches from the every-other-needle to the neighboring needle. Move the needle without the stitch to A position (non-working position, pushed all the way in). Watch the video at 6 min 54 s if this step is unclear. I am also showing in the video that you can use an adjustable stitch transfer tool to move 2-4 stitches at a time. The adjustable tool can be purchased in my independent store or in my Etsy store.
  2. Continue for the rest of the needles. Optional but helpful: hang a claw-weight on the edge of the knitted fabric next to the stitches you are transferring. The transfer will go a bit smoother without snagged yarn.
  3. Increase the yarn tension by 2, i.e., decrease the tension dial by the number 2.
  4. Knit 10 rows on every other needle.
  5. Make a buttonhole as described above in step 1.11. After that knit 10 more rows. Or continue knitting for 10 more rows without making the buttonhole. Maybe you do not want the cord in the second ribbing. I also show in the video that the cord can be inserted into the mock-ribbing fabric without the buttonhole. So, at the end of this step you should have 20 rows of mock ribbing.
  6. Folding the second mock-ribbing: using a one-eyelet tool, transfer stitches from the 1st row of this mock ribbing to the needle in the working position. (See the video for details). In words: find the stitch right above the hole (created when we transferred every other needle) onto the working needle right above it. Continue for the rest of the panel. Even out the needles to be as close to the B-position as possible.
  7. Optional: Hang the cast-on comb with the weight onto the just-folded fabric. Loosen the yarn tension (increase the tension on the carriage dial by 1-2 numbers).
  8. Knit one row.

Step 4: Cast-off

  1. Remove the yarn from the carriage. Let it hang free on the side.
  2. Remove the cast-on comb.
  3. Using the one-eyelet tool, remove the stitch on the very edge of the needle bed and transfer it to the next needle. Manually knit a stitch on this needle (see the video for visual reference). The manipulations in this step are similar to the cast-off in hand-knitting. Continue for the rest of the needle bed.
  4. Close the last stitch and take the panel off the bed. Secure the last stitch with a knot.
  5. Hint: when making a stitch, push the last needle (with a needle with two stitches) to the A-position. In this case, it creates a long stitch and a loose cast-off seam.
  6. Optional: hang the claw weight on the fabric below the last needle in the working position. It will create tension on the fabric for easier removal of the stitches from the needles. Rehang as you cast-off the stitches.

Step 5: Sewing the panels together.

  1. Remove the contrasting yarn by pulling it out of the knitted panel.
  2. Remove the waste-yarn-knitted section. It will come off very easily after the contrasting thread is removed.
  3. Fold the fabric with the right sides touching each other (stockinet sides, in my case).
  4. Start sewing the fabric at the folded section. Match the internal sides of the folded section first. I like using backstitch for such seams (but it actually does not matter how it looks because this will be hidden inside the fold), moving to the outside edges. I like using a mattress-like stitching technique on the outer edges of the folded section of my knitted panel. After the fold, keep on sewing, again with the stitch of your choice. I like back-stitch – it creates very knit edges and seams on both sides.
  5. After reaching the second folded section, again, sew first the internal panels of the fold using a back-stitch and then the external sides using a mattress stitch. Hide the ends of the yarn used to sew the panels.

Step 5: Cord making

  1. Make two cords, roughly 30 inches long. Use your favorite method or make it on your flat-bad knitting machine (follow the steps outlined in my other article).
  2. Secure the ends of the cord: make a knot and then sew through the knot with the remaining yarn (watch my video on cord-making).

Step 6. Inserting the cords.

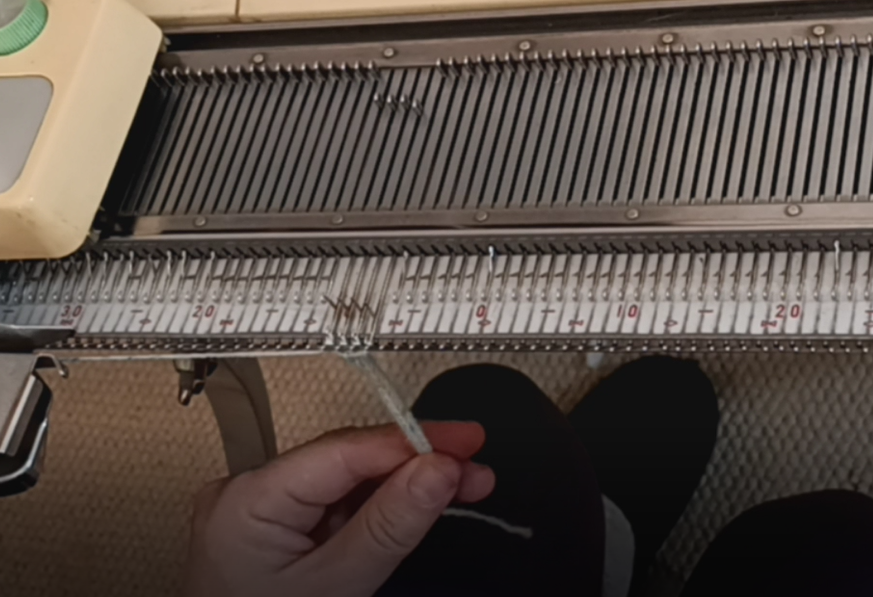
  1. Insert a safety pin into the knot of the end of the cord.
  2. Insert the safety pin head into the “button hole” we created.
  3. Thread the safety pin with the cord through the fold and pull out from the fold through the “button hole”.
  4. Do the same with the second cord on the second fold. Hint: if you forget to make a button hole, the 1×1 mock stitch ribbing is loose enough where you can insert the head of the safety pin through the stitches.

Happy Knitting!

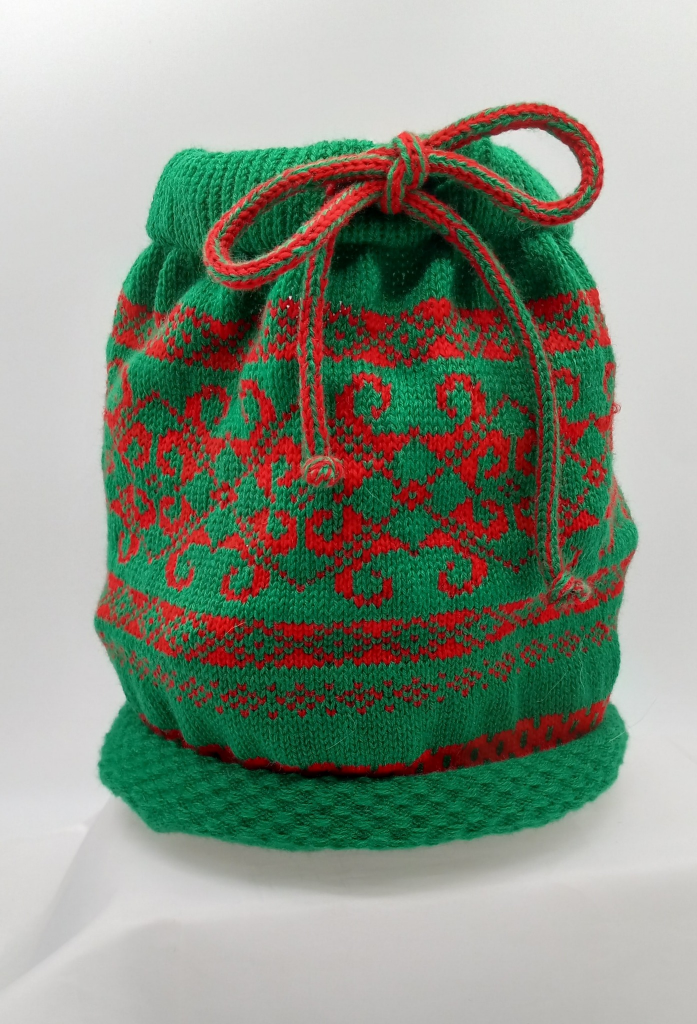
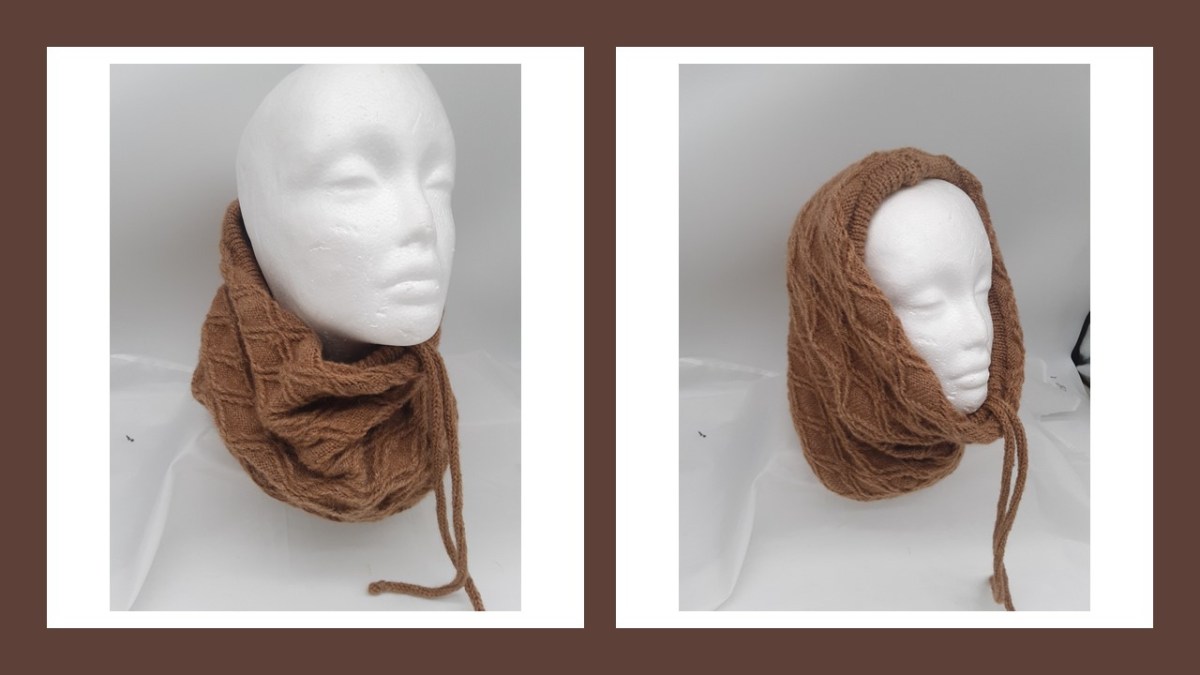
The same approach can be used for patterned panels, like those shown below.

It can also be done on bulky and mid-gauge machines. Choose a variegated yarn for best effect:

Steps I take when cleaning and servicing flat-bed metal knitting machines.

.. this article is a constant work in progress as I collect more information and personal experience… LAST UPDATE: March 2026

… Please, read the whole article first before proceeding.

Abbreviations used below:

  • KM = knitting machine

If you purchased your KM serviced from a reputable seller, you can skip this post and go straight to the post where I recommend the very first steps/tests with your new KM.

If you were not as lucky and got a machine that still needs TLC, below are the steps you can follow. A lot of new machine knitters get a machine from friends and relatives or just find one at a garage sale, and feel very overwhelmed. Well, I hope the steps below will help you to guide your approach to cleaning and testing your KM.

First inspection, cleaning, and servicing steps:

  1. Check against the manual if all parts are present. (If your KM did not come with a hard copy of the manual, search its model number, and you will easily find a free PDF file of the manual. The most critical ones are a carriage and a sinker; they are a MUST-HAVE. The secondary is a tension mast (I managed to knit on a machine by just holding the yarn in my hand and creating tension by hand, but this is far from ideal, but doable if you have to). Also nice to have are claw weights. If others are missing, you can probably manage to knit without them. If the major parts are missing, search on the Internet to purchase them, and while they are arriving, work on the steps below.
  2. Clean/wipe the visible dirt from all parts.
  3. Remove the retaining bar (metal strip sitting on top of the needles). Push it in from one side until the other end shows up on another side, and then pull completely out. The manual should mention the retaining bar in the section about needle replacement. If you have a long-tail brush, insert it into the channel for the retaining bar and clean the gunk out of there. DO NOT RUN THE CARRIAGE ON THE NEEDLE BED UNTIL YOU INSERT A RETAINING BAR WITH THE NEW SPONGE BAR. I have a separate blog post dedicated to the retaining and sponge bars and how to clean/refurbish/restore them.
  4. After the sponge bar is out, remove all needles, clean/wipe them, and inspect. I visually inspect if there is deep rust (if there is just shallow rust – I gently polish the needles with fine sandpaper), and obvious bends. Wipe all the needles while inspecting them. Check if the latches move freely back and forth and do not stick (sticky latches can lead to incorrectly formed stitches, especially tucked stitches).
  5. I vacuum the needle bed from the top (simply run the narrowest attachment your vacuum has over the needle bed). I unscrew the top plastic panels, detach all the plastic components from the machine’s front panels, and vacuum underneath. If you are brave, do the same: it is not as hard as it seems.
  6. If you are even braver, remove the plastic end-caps and vacuum from the sides as well. But if the machine is clean under those long front panels, you probably don’t need to remove the end caps, which is good news because they are kind of a pain to deal with. However, I typically remove the machine from the case to clean and inspect for rust. I wipe, vacuum, and clean in the crevices of the needlebed and the case panel. Sometimes I wash the plastic panels and metal covers of the lid and the case thoroughly, but I never apply harsh chemicals. I would rather leave a couple of stains than treat the panels with acetone or other solvents, which might damage these already fragile vintage parts.
  7. While the panels are out of the way, check if the punchcard reading mechanism moves freely. Often, those gunk up too (or freeze simply due to time) and need to be cleaned. There are video resources available online on how to clean the punchcard reading mechanism. However, I do not recommend disassembling the punchcard mechanism completely without trying less drastic measures (like simply spraying with Kroil oil and cleaning with wipes and Q-tips). It is often not even needed to go that deep, and the error of assembling those intricate mechanisms back happens quite often.
  8. Then check if the buttons on the carriage move freely (middle button and tuck/part buttons). Those often get stuck as well. Kroil Oil will take care of that: spray the Kroil oil over the frozen parts and try to jiggle them every several hours. Reapply Kroil oil as needed. I also, in most cases, remove the top lid and clean the mechanisms deeper.
  9. Check the undercarriage for visible lint, dust, dirt, etc. Clean with Q-tips if needed. If the carriage is very dirty, use the LPS lubricant/cleaner for a faster (but significantly smellier) process. Make sure all levers on the undercarriage move symmetrically when you press the buttons on the carriage. Move the levers with your finger or a tool and ensure they move freely and snap back to the original positions without lag.
  10. Inspect and clean the sinker plate. Often, yarn is caught around the brushes. Clean all brushes of lint.
  11. Insert back all the freshly inspected and cleaned needles. Double check again if they are straight (I compare them to each other first, and then, if in doubt, to brand new needles). Double-check the latches: those are very easy to overlook when cleaning several needles at the same time. When the needles are inserted, and the retaining bar is in, visually inspect the distances between the needle heads: this visual inspection shows slight bends of the top section of the needles, which is sometimes hard to catch when pressing the needles to each other.
  12. Insert a refurbished or new retaining bar with the new sponge. (Read my other blog post on how to clean/refurbish/restore them.) Make sure the retaining bar is inserted correctly (with the spongy part touching the needles and the retaining bar being on TOP of the needles). If you bought a brand new retaining bar assembly (metal+sponge), make sure the width of it is the same as the original retaining bar.
  13. Put together all large plastic pieces (covers, boxes, and lids) if you removed them for cleaning.
  14. Place the carriage onto the needle bed.
  15. Attach the sinker plate according to the instructions.

Once you are satisfied with all the cleaning, you can start testing your machine. Please read the first tests I typically subject my freshly refurbished knitting machines in my other article.

How to make punchcards for Brother KH800 and KH801 knitting machines.

Brother KH800 and KH801 knitting machines have unique designs for needle selection: they accept 12-stitch punchcards that are positioned flat on the special panel on the machine (called “card presser”).

Brother KH800 pattern center with the 12-hole card pressure in the middle.

If your machine came with original punchcards, you are super lucky! If you did not get the punchcards, or you want to make more cards for your own custom patterns, it is very easy to do.

Below are step-by-step instructions. You can also watch a video I made with these steps.

You need to cut a piece of paper, 20.5 x 6.5 cm (8 x 2.5 inches). Regular printer paper will work. Or print this file which shows blank cards for KH800. Another option is to print a standard set of cards (from the file downloaded here) and then punch the holes using the steps I will describe below.

Insert the cut-out punch card into the pattern card cassette holder. The manual describes all the steps of inserting the card really well. The only difference from the manual is that you will have to push the paper through the setting pins.

If your machine comes with a special puncher, you are again lucky. You can now use it to punch your pattern through the holes. If your machine did not come with it, you can use a marker with a relatively thick end. Ideally, find a marker that no longer draws (dried up or broken) so it does not draw on the machine.

Continue punching holes according to your desired pattern.

The holes do not have to be fully complete: they just need to be open enough for the patterning rods to go through upon activation.

Watch in the second half of my video how I tested and ensured that the rods indeed went through.

Happy punching and Happy knitting!

Also, read or watch about the patterning mechanism of Brother KH800/801.

Knitting cord on Brother flat-bed knitting machine.

If you own a Brother flat-bed knitting machines, like pushbutton KH551, KH585, KH588 and KH710, or Brother punchcard machine like KH830, KH840, KH860, KH890, etc., or even electronic models, like Brother KH910, KH930, KH940, KH950, KH965, and even KH970, you can make cords on these machines in just quick 5 minutes or less.

The steps are outlined below. Or, if you are a visual learner or some terms in this article are not quite clear, watch this video.

1. Move the carriage to the right-hand side of the needle bed and press the right-hand side PART button.

2. Move to the most forward position 3-4 needles and perform an e-wrap cast-on with the short end of the yarn being on the left side. This post does not go into details into e-wrap cast-on, so if you are unsure how to do it, there are a lot of online resources on it.

3. Thread the long piece of the yarn through the carriage as usual.

4. Move the carriage from left to right while pulling the short end of the yarn down. After the first tow is knitted, if you prefer, attach the claw weight to the formed stitches. Or, pull the knitted fabric down by a free hand.

5. Continue knitting with the carriage moving it side to side while pulling the formed cord with the free hand.

6. When a desired cord length is achieved, cast off with your desired method. Tie a knot on each end and fasten the knot by sewing several stitches over the know with the yarn left on each end.

The cord can be used for hoods, hats, neck warmers, or for decorations.

How to choose your first knitting machine.

… this article is constantly being updated depending on the questions my customers ask me. So, check frequently.

LAST UPDATE: March 22, 2026

My customers often ask me: what machine will I recommend for a beginner, for a fiber artist, for an experienced hand-knitter, to start a small craft business, or to experiment with stitches and techniques?

There are several things to consider. For example:

  • You are a hand-knitter (or crocheter) with a large stash of yarn and fiber, or your stitches are not even, or the small finger movements are no longer feasible for you;
  • or you have never hand-knitted before and just want to explore what machine-knitting is.

If you know how to hand-knit, then the next question is: what do you want to do with this machine? Design cloth, make new fabrics, make custom patterns, or simply knit through your yarn stash? Do you want to make blankets and throws and if yes, how wide? Also, ask yourself: do I just want to knit for friends and family or to sell? The next series of questions is how much patterning you would like your machine to do. And of course, you need to have a clear picture of what your budget is and how comfortable you would feel with servicing a new-to-you machine.

Here are some of the things to consider for the options mentioned above.

If you are considering getting a machine to go through your stash quicker, check what is the thickness of the yarn you have the most. If sport-weight and below, you will be able to go through your stash with the standard-gauge knitting machine. If thicker – then you should consider getting bulky and mid-gauge knitting machines. Fine-gauge knitting machines create wonderful, profesionally-looking fabrics, but they are not recommended for knitters who are just starting to explore machine knitting.

Overall, good entry-level knitting machines are circular plastic ones (like Addi or Sentro), and plastic flat-bed mid-gauge, like Brother KX350 or Silver Reed LK-series. These will take worsted yarns or double-threaded thinner yarn (available in craft stores for hand knitting) and will create lots of great hats, scarves, vests, and simple sweaters.

If you are a hand-knitter transitioning that just wants to make sure all stitches are even, the panels are knitted faster but you are not quite ready to give up the satisfaction from hand manipulation stitches (like creating cables, lace, etc.), consider standard-, bulky, and/or mid-gauge knitting machines with only manual/basic patterning capabilities.

If you want to create a lot of intricate patterns and designs, you will need to consider machines that can pattern with less annual needle selection and stitch manipulation. Namely, the needles would move to the patterning positions with some button pressing and the type of stitches will form in a predetermined way. The highest technology for such performance is electronic knitting machines. Those not only have several hundred built-in patterns but can also accept custom patterns from external sources. You can create those patterns yourself. Knitters can still do all the same manual stitch manipulations on electronic machines as on basic knitting machines (just turn off the electronics and select needles by hand). Read separate posts on how to choose Brother and/or Studio/Silver Reed/Singer electronic machines. Also, let’s not forget that Passap also made electronic machines for hobbyists and small shops.

If you are not super technology-savvy and could settle for less intricate patterns, consider machines with punchcard-reading capabilities. They come in bulk and standard gauges. The repetition pattern is typically 12-24 stitches. There are so many various designs circulating on premade punchcards. You can also punch your own cards (doable but quite a tedious process). Some drawbacks are somewhat finicky punchcard reading mechanisms, that sometimes cause troubles. Also, punching custom-punchcards is somewhat a tedious process but doable with enough patience and practice. On a punchcard machine, knitters can still do all the same manipulation and stitches as on manual/basic machines if the punchcard reader is not activated.

If even this seems too much to manage, consider push-button or turn-knob machines. These machines offer 4- to 8-stitch repeat patterns. With some hand manipulations, patterns with more stitch repetitions can be accomplished. Despite being the oldest patterning technology in machine knitting, these machines are robust (almost all metal), and offer endless possibilities. I only saw standard- and fine-gauge turn-knob and push-button machines. I put couple of articles together on pros and cons of pushbutton, turn-knob, punchcard and electronic knitting machines.

A lot of fiber artists like pushbutton machines a lot because they feel more control over the stitch manipulation and needle selection, yet it is still not completely manual. However, sometimes it is hard to accessorize these machines with attachments (knit-leader, ribber, color changer) due to their vintage nature.

Now, about picking a machine depending on your desired projects. If you know for sure that you want to knit sweaters or garments, you should probably get a machine with a built-in knit leader (aka charting device) or a machine that can be attached to one. Some older models of knitting machines cannot be accessorized with knit leaders, so keep that in mind. There are only a couple of models of Brother Machines with built-in knit leaders (most popular ones are Brother KH881, KH891), while Singer/Silver Reed/Empisal KNitmaster/Stuio were more prolific in that sense. Check out a full list.

If you want to knit beanies: do you want them to be seamless (then get a circular machine, which are very affordable) or don’t you mind seams (flat bed is ok in this case)? Or what about socks? Circular sock machines are pretty expensive. Plastic circular machines are be used as well, but socks do not come out as nice looking. There are patterns for flat-bed machines for socks with and without seams and their looks are different as well depening on the technique.

If you want to knit colored patterns (jacquard or fair-isle) with more than two colors, your desired machines should probably be compatible with color changers unless you are willing to manually changing color, which is a rewarding but tedious process. Also, do you want to knit double jacquard, no floats in the back? Then you will need your machine to be compatible with a ribber. Some ribbers have an automatic option to allow knitters to know double-jacquard semi-automatically (read on Brother KR850 ribbers). Some still require hand manipulations, but much easier than if you did not have a ribber.

If you want to knit blankets that create knits mostly resembling handknitting, get a machine with the most stitches in a row like a mid-gauge manual SK160 or electronic SK860, but, boy, they are pricey and hard to find. Standard-gauge machines will knit wide enough panels but it will look like machine knitting. If you want to knit custom patterns, or for production, consider electronic machines as they can be fitted with many additional accessories later. Additionally, for blankets, knitters often get a couple of plastic bed machines, like HK100 and KX350, and combine the beds (it is very easy to do – just remove the connecting plates and then reconnect the plastic parts of the bed onto the first bed) to get a double length.

With regards to the manufacturer, very popular machines for beginners are Brother (also branded under Knit King and other names) and Silver Reed (also branded under Singer and Studio names). The parts for these machines are still available in the new and used markets, which is a huge advantage. There are other wonderful knitting machine makers, including Toyota, Corona, Passap, etc.

A lot also depends on your budget. Plastic flatbeds are typically less expensive. Brother machines in general are a bit more expensive than Silver Reed, but it all depends on the dealer or the marketplace where you are looking. Additionally, the more patterning capability diversity the machines have, the more expensive it is (because it is more desirable). Thus, electronic machines typically cost more than manual or pushbutton. Additionally, bulky machines are more expensive than standard-gauge machines. Mid- and fine-gauge are the most expensive because not so many of them were on the market to begin with and they are highly desirable. As you can now guess, the most expensive machines are electronic bulky and mid-gauge machines. All these machines have their pros and cons, about which you can read in my Knitting Machine Encyclopedia.

You need to think about what kind of stitches and fabric you want to knit. Lace? – make sure your machine comes with a lace carriage. Garter stitches? – Make sure your machine is compatible with Garter carriages (only standard-gauge Brother knitting machines model numbers KH8xx and up). Fair Isle? – better if you can use at least two yarns at a time. Or make sure your machine is compatible with a color changer. The same principle applies to weaving.

Also, would you like to knit both purl- and knit-stitches? A ribbing attachment does a good job doing that so choose a machine that can be matched with a ribber. Ribbers for electronic and punchcard machines are somewhat easier to find than ribbers for pushbutton and turn knob machines but they are still doable. Another nice attachment that can knit purl stitches, is a Garter carriage but it is only available for Brother knitting machines.

Also, consider your physical limitations. Can you lift a 20+ pound knitting machine? If yes, then metal flat beds are indeed for you. If not, you should consider getting a plastic flat or circular bed knitting machine. The latter ones are also great if you cannot live without knitting and want to travel with your machine.

Last but not least, consider how much you want to grow with your new hobby of machine knitting. (I know – sometimes we don’t know what we don’t know but we know ourselves). For example, do you think you might outgrow the basic functions of your machine quickly and will want to purchase add-on accessories (ribbers, color changes, etc.)? If so, consider getting machines for which these accessories exist and are easy to find. For example, some basic vintage machines never had ribbers or color changers manufactured for them. Some push-button Brother machines and some turn-knob Silver Reeds had ribbers but those are hard to find. So, settle on punchcard-reading machines.

But I do not recommend buying a machine with all accessories at once (Unless you came across a super deal in a local garage sale where the machine is included with all accessories). You might feel overwhelmed, and intimidated and might regret spending all that money at once. need to buy all gadgets at once. For example, if you can’t get a hold of a machine with built-in knit leader, but a machine with a built-in knit leader landed on your radar, you should go for is and get a stand-alone knit leader later while you are learning a new-to-you machine, including shaping (stitch transfer for decreases, patterning, gauging, switching, etc.)

Overall, I would suggest just to trust your gut, your budget and your skills. For example, if you are not tech-savvy, electronic machines might not be the right choice for you. Or you will only be limited to the built-in patterns (but there are plenty of those). If you are having issues with hands, do not get machines where patterning is activated with a ratchet tool (Brother push-button machines, some Toyota machines and a 12-stitch punchcard Brother KH800 model).

To sum up and not considering factors like maintenance and availability of the spare parts: if you are just exploring and want to get rid of your hand-knitting yarn stash, get a simple machine, like Addi or mid-gauge plastic bed (like KX350 or LK100). If you are exploring but with specific projects in mind, get machines that can pattern more automatically and can grow with you.

I wish all of you good luck with discovering your dream knitting machine and starting your new adventure of machine knitting. Shoot me a comment on what machine you decided to get and why.