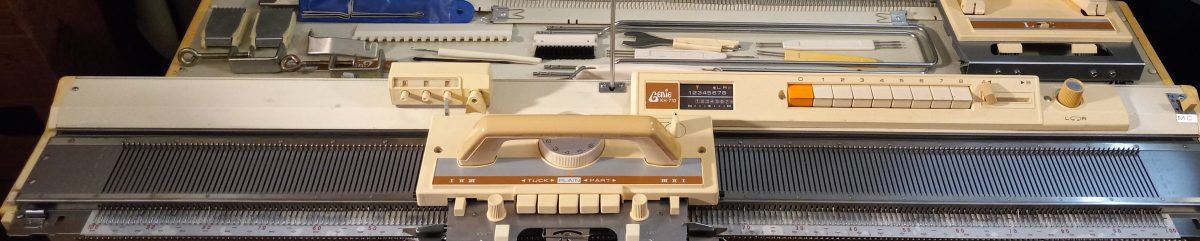
Brother, aka Genie KH710, refurbished in March 2023

Brother/Genie KH710 knitting machine is a 4.5 mm (standard) gauge machine with 200 needles. This chart states that it is the same as KH588 but my experience with both KH710 and KH588 is that those are slightly different (see my other post).

Brother KH710 is one of the latest models for the 8-push button knitting machines and has a lot of modifications not present in earlier models (like KH552-KH588). The case has more plastic (for example, end caps are plastic and not metal like in KH588 and earlier 8-push button models). The carriage covers as well as the handle are also not metal but plastic. The standard setup comes with a lace carriage and cast-on combs. The handle no longers screws on but is permanently attached to the carriage (good – fewer things to lose – I see so many machines arriving without these screw-on handles). But the handle folds for easier fitting into the case.

Besides 8-push buttons, genie 710 has a pattern center, which allows you to fix the needle selection and simply move the following needle selection relative to the initial position. It also allows (using the reverse lever) to select either needles push-in or select needles, not pished-in.

About this particular machine:

It was very easy to use it. The carriage slides very easily – in my video I show that I could use just one hand.

The machine comes with all major and minor assesories. 

The assesories fit nicely into a special toolbox with a matching lid.

The hard copy of the manual will not be included. The manual is available for download here. It mentions some of the patterns and button/lever variations. More patterns and variations of push buttons can be found here.

I inserted a brand-new retaining bar with a brand-new sponge. All needles were inspected individually. I tested this machine on a full bed using stockinet, pull-up, and tuck-stitch patterning (shown in my video). None of the needles were mispatterning and the knitted fabric looked even and great. 

After I gave it some TLC, the machine feels and looks like new. It is very lightweight (because end-caps are plastic.

The case has some cracks: see the pictures below but they do not affect the functioning of the machine.

Genie 710 is excellent for beginners or for advanced knitters who prefer hand-manipulations of stitches and needles. I hope you will consider adding this machine to your craft room.

SRN321 ribber, suitable for Singer/Studio/Silver Reed knitting machines.

This ribber is sold out but check my Store for other ribbers and machines.

If you came here because you are looking for a ribber for your Singer 321 or earlier model knitting machine, you came to the right place.

Ribbing attachment SRN321 is so easy to install (aka, attach to the main bed) and so fun to use! Need one now? Check out my Etsy store.

Want to know more? Keep on reading!

Studio SRN321 ribber is an attachment that allows alternating knit and purl stitches. It was released in 1972. The ribber has 200 needles. Studio SRN321 ribbing attachment fits the following knitting machines: Singer/Studio 321, as well as models MOD. 315, 313, 312 and 305. SRN321 ribber adds so many patterning possibilities, as mentioned in the instructions and beyond. I did not see in the instructions if this ribber can provide double jacquard possibilities and I did not test it myself yet.

About this particular ribber.

I tested it in combination with Singer 321 knitting machine. The carriage slides very easily on the full ribber bed. I feel that the instruction explain really well how to knit all kinds of ribbing.

Tested on 1k 1p rib, double rib (see the cast on-thread and the first several rows below) on 30 needle swatch and on the almost full bed with the singer 321 knitting machine (not shown – forgot to take pictures but check out my video). The 1×1 ribbing created on this machine was so stretchy and pretty! I fell in love The carriage is so easy to move although it might take some time to get used to it (as opposed to using only the knitting machine).

I also tested the partial ribbing on this machine while the main bed was knitting the tuck-stitch pattern (see my video for that as well).

All major assesories included. Minor assesories missing are:

  • Hard copy of the manual will not come with this machine but could be obtained online.
  • Oil (it was old and I discarded it). Good oil to buy for any knitting machine is Gun oil.
  • Screw driver but any flat metal piece would work. It is mostly to screw the large bolts onto a machine. I used a thin coin.
  • Replacement needles: I am currently outsourcing them and hopefully I will have them soon.

I personally did not find any cons with this ribber. It does the job so well. It was absolutely not overwhelming to use and was extremely easy to set up. I think it is an excellent ribbing attachment for beginning machine knitters.

I hope you will be as excited as I was using this ribber. It is available in my Etsy store.

Pictures of upgraded Singer 321 for Katherine

Overall view of the setup.

Right-hand side end cap on the main bed

The left-hand-side end cap on the main bed

The lid with replaced end-caps

The lid end cap upclose

2023-02-06 KH588 for Holly, cleaned and tested in February 2023

This is a Brother KH588 knitting machine with an 8-push button needle selection mechanism. This model was released to the market in the late 1960s-early1970s. This model is equivalent to a rebranded Genie 710 (in case you need to search for information related to this machine). These are other 8-push button models similar to this one: KH581, KH560, and KH552, but their pattern control center is a bit less “sophisticated”. The pattern control center in KH588 makes your job of creating patterns and following the sequence of which buttons and levers to push the easiest.

The “patterning center” consists of:

  • 8-push buttons. If a specific needle wants to be selected, the corresponding button is pushed. The red button cancels out the button selection.
  • Slide dial (the blu knob on the white panel. It determines in what direction (left or right) the needle selection will be moved relative to the very first selection
  • Slide indicator (to the left-hand side from the push buttons). It helps to determine in what direction the needle selection is moved and also what needles are currently being selected.
  • Reverse lever (the bluish knob to the right-hand side of the pushbuttons, it is left to the slide dial). If the reverse lever is pushed to the right, then the needles that are not selected by the pushbuttons will be moved (AKA selected).

    In my video, recorded specifically for this machine, I demonstrate three patterning techniques and how I moved the levers, knobs and a ratchet. At first, it took me a while to figure out a chart but after just 5 minutes, I was able to develop a groove and knitted faster without problems. More sophisticated patterns (many of them can be found here) will probably need a bit more concentration. I also tested knitting cables on this machine. The hardest part of the cables is to keep track of which stitches on which needles to swap. But with the patterning center on this machine, these positions can be kind of memorized by the buttons pushed and it makes keeping track of stitch-swapping easier.

A couple of things I personally found interesting in this model. Check out the carriage image below, in particular, the levers on the bottom left and right sides of the carriage with markings I, II, and III. This feature was unusual to me since in other early versions of Brother knitting machines (manual 4- and 8-push buttons) these levers are on the actual sides of the carriage. I found this feature of KH588 very convenient. The positions of the levers are right in front of your eyes and it makes it less hard to overlook the position of these levers (which happens quite often ).

About this particular brother KH 588 machine.

In this particular machine, the words on the carriage (with the exception of huge BROTHER branding) are in Japanese. I asked the knitting community and apparently, not all KH588 are in Japanese. At the very end of this blog, I show pictures to be used as English references.  Maybe this machine was brought from Japan.

Below are the pictures of pattern examples I tested (also shown in my video on all 200 needles).

  • The top is the tuck-patterning on every other needle (EON) selected. On this side, it almost looks like a seed stitch. On the other side, it looks like a ribbing, which I like a lot. I specifically did not say “right” and “wrong” sides because both of sides of this pattern can be right and wrong. This pattern is interesting on both sides.
  • The bottom pattern is a “holding” pattern, in which we bring every 4th needle to the holding position and do not knit on it and the yarn kind of hooks on these needles creating these bow-like knots. In hand-knitting, this is called a “butterfly” pattern.

  • The top pattern in the swatch below is the tuck/slip pattern. It creates a very interesting texture and is actually very easy to make. It creates sort of like a ribbing but not as tight as a full eon-tuck shown in the bottom part of this photograph.

The knitted fabrics I created while testing this machine were converted to the two cowls shown below. They are going to be donated to a charity in my area.


The machine comes with all major assesories, including the extension rail, cast-on combs (tucked in the lid), and the lace carriage.

A couple of minor accessories  missing are:

  1. Oil. It was too old and I tossed it. I recommend getting gun oil on Amazon.
  2. Cast-on thread. I typically use a thin contrasting yarn for this purpose.
  3. The toolbox has cracks: the plastic became old and brittle. The lid for the toolbox did not make it at all: died from old age

I included a 1×1 needle selection tool – it is not part of a standard setup but is very handy to use, especially for a quick 1×1 (or every-other-needle (EON) cast on).

The hard copy of the manual will NOT be provided but can be found in here.

Couple of other useful links:

  • A service manual in case your machine starts misbehaving;
  • A large variety of patterns that this machine can achieve.
  • I also feel that this manual (although it is for a slightly older model) describes how the patterning center works really well as well

    Now, about the imperfections of this machine and setup.

The posts, where the handle attaches to the lace carriage, show some rust. The handle still attaches well and effortlessly.

There are some minor rust spots on the sinker plate (on the underside, on one side only

The case has some pumps but nothing major. The toolbox has some cracks – the plastic is too old and brittle. It is also missing a lid (or it never had a lid – not sure since the manual says nothing about the lid).

None of these imperfections affected the working functions of this machine.

The machine came with several damaged needles and I had to replace them. Since nobody manufactures new needles for these machines, I had to use refurbished needles from a machine I stripped for parts. I tested the needles I inserted into this machine to make sure they knit well without problems. Here is the video of the exact needles I placed into this machine.

Below are the images of another KH588 but with all English writing (kindly provided by other push-button knitting machine enthusiasts from https://www.facebook.com/groups/PushButtonPatterningKnittingMachines) to be used as a reference when operating this particular KH588. I included the hard copies of these pictures with the setup for Holly.

Brother KH930E prepared for Mercedes in December 2022

Brother KH930E is identical to Brother KH930. The only difference is This brother knitting machine has greenish color on the carriage. Brother KH930e was an anniversary edition and this is why the difference. Brother KH930 machines are capable of electronic needle selection to knit various patterns. There is a vast library of built-in patterns, which are listed in the stitch book. Custom patterns can be entered manually into the machine. There is an optional cable that allows transferring patterns directly from a computer (through special software).

Now, let’s talk about the specifics of this particular machine.

The machine was cleaned, and every needle was inspected and tested. The whole purpose of my demonstration of knitting on a full bed is to ensure that all needles create even stitches. During the testing, I noticed that one of the needles was creating uneven stitches… I replaced it (without taking the fabric off the machine) and the problem disappeared. See my video and a picture below.

The machine did not come with many tools but I put together a set of tools. Looks like some of the tools that were actually included were added later. For example, the lid color is different from the rest of the machine. The electric cable also looks a bit worn out but works great. Cast-on comb, rails, and lace carriage look in good shape (although I did not test the lace carriage except for making sure all buttons move freely).

The minor things that are still missing:

  • Had copy o the manual; it can be found here. Manuals for KH940 and KH930 are identical.
  • Design Sheets. This is just simple graph paper to create patterns first on paper to visualize them better.
  • Caton-on cable. Any other silky or easy-to-remove yarn would do.
  • Tapestry needle – just use your favorite needle to sew garments together
  • The carriage lock was missing but it is important to have it when putting the machine into storage. It ensures that the carriage does not slide when moved or transported. I included a 3D-printed carriage lock.
  • Wax is not included.
  • Oil can be purchased here

None of these tools are critical to the machine’s functioning and allowed me to successfully test slip, touch, and fair-isle patterning on this machine. Please, refer to the video. All the buttons and levers on the carriage move freely.

I even tested the custom transfer of a pattern I created in special machine knitting software. I used a custom-made cable and transferred the pattern to the machine and then knitted it. This is what I got Couple of nerdy gifts for my nerdy friends

Now about imperfections.

One of the plastic connectors is missing so the model tag is often sliding.

The case lid and the lower part of the machine case have several scratches and dents. Needless to say, it is kind of expected from a 30+-year-old machine and these dings absolutely do not affect how the machine functions.

The most obvious problem is the crack near the switch. But the whole time I knitted on this machine, this did not cause any problems. I am going to cover it with masking tape so the dirt and lint do not get inside too much.

Read more about this model in my Knitting Machine Encyclopedia:  https://mightyknittymachines.com/brother-kh930-electronic-knitting-machine/

Below are the items I knitted while testing this machine.

Reversible neon yellow/green, purple, and blue fair isle cowls/neckwarmers.


My biggest reward and satisfaction will be you making lots more beautiful items.

KH581 cleaned/fixed/tested in November 2022

MESSAGE ME AT FACEBOOK/COMFIKNITS IF YOU DONT SEE A PAYPAL PURCHASE BUTTON.

THIS MACHINE IS ALREADY SOLD….CHECK MY OTHER POSTINGS AS THE NEW MACHINES ARE COMING 1-2 TIMES A MONTH

A little bit about this model: Brother KH581 is an 8-push button machine. It first appeared on the market in 1969. This particular model was probably made specifically for Japan as the carriage has Japanese markings only (although this is the first and only KH581 I’ve seen so far in real life). It is similar to other eight push buttons Brother machines sold under models KH 588, KH561, KH560, KH585, although I have not tested those yet and there might be some minor differences. This model comes in pretty blue color and even some the assesories have blue tints. I find this color very attractive and unusual.

The standard setup comes with a lace carriage and rails. I think that is the first model to have both of these in its standard setup.

A big advancement of this model over its 4-push button knitting machines (like KH551) is the presence of a whole “pattern center”. It consists of familiar push buttons and a lever with a wrench but also of a slide indicator and a reverse knob. The manual is very clear about what they are but it still took me some time of playing with them to get what it does. Once I figured it out, it was almost like an EUREKA moment to me! I, once again, just was amazed how smart Japanese engineers are.

So, in regular 4-push buttons machines, we need to select the buttons (and then unpush them) every time we need to select certain needles. In 8-push button machines, we select the needles once and then the reverse knob and we simply tell the patterning center by how much the needle selection needs to be shifted. Once I got a hang of it, I was blown away by how simple it became to memorize your needle selection. In fact, you don’t memorize – you simply shift it. Also, excellent pattern charts in the manual explain it really well. Just don’t be discouraged by a learning curve and experiment with the swatch. You will see in my video that while knitting the butterfly pattern (referred to in the manual as “holding” pattern, I selected the buttons only once at the beginning. The rest of the needle selection was done by only turning the reverse and slide knobs. I also feel that this helps to reduce wear and tear on the buttons: the spring indeed will loose their strength from constant pushing and unpushing.

The manual shows how to work the most basic patterns. Additional patterns can be found in here.

The machine setup is very easy and almost intuitive. I still recommend following the instructions.

Pros and cons of KH581 in comparison to other brother knitting machines.

Pros (in no particular order):

+ Much simpler needle selection process especially for complex patterns, where different needles need to be selected during each row.

+ Lighter than more modern machines. Thus, it would be ideal for those with weaker upper bodies.

+ Relatively compact: needle bed is narrower than its younger counterparts.

+ Excellent for hand-knitters who want to transition to machine knitting. Often hand knitters are seeking for more even stitches or for less wear on their hand and finger joints when knitting every stitch manually, yet they don’t want to give up the pleasure and satisfaction of manipulating stitches. I had several customers who bought push -button machines from me for this exact reason.

+ Excellent for beginners, crocheters and knitters, as it is not overwhelming as electronic and punch card machines might seem at first.

+ Since the machine is mostly mechanical, not many things can go wrong. Just keep this machine free of dust (which can be achieved with regular vacuuming and sponge bar replacement) and free of moisture.

+ Pretty blue color which makes this machine stand out.

+ All tools are interchangible with other 4.5 mm gauge machines and can be easily purchased new or used.

+ Carriage is very easy to move. I was able to do it with just one hand (but it also depends on a correct combination of yarn and tension).

+ Matching ribbers are available and can still be found on the used market. In fact, I am testing a matching ribber (Brother KR580) right now.

Cons (in no particular order):

  • I was not a big fan of the tension mast being stuck inside the tool holder…
  • Replacement needles can only be found on a used market. Nobody makes them anymore. I have plenty or replacement available in my shop.
  • Fair isle knitting might not be as easy as on punch-card and electronic knitting machines.
  • Hand-manipulations of stitches and keeping track of which buttons to push and which levers to turn might be overwhelming for some knitters.

About this machine in particular:

It knitted very well and handled sport yarn, acrylic and wool, at different tensions really well. I did not feel that the machine was sensitive to yarn tension, which was pleasant and allowed me to relax while knitting.

I inspected every needle on this machine to make sure the bed has only good and well-functioning needles. I also inspected the stitches they make (this is why I run all my knitting demos on a full bed). I replaced a sponge bar and cleaned the machine.

Tests on a full bed confirmed that everything works great. I tested stockinet, slip-stitch, tuck-stitch and tuck with hold patterning. Check out my video to see this machine in action on a full bed. Below are pictures showing the swatches with patterns I tested.

I did not test the lace carriage but I thoroughly cleaned it and ensured that all buttons, knobs and levers moved freely.

All major assesories are included with this particular machine except for:

  • A hard copy of a manual. A scanned pdf copy can be downloaded for free here or here (this particular manual is the exact copy of the hard copy I used to learn this machine).
  • The lid to the storage box – it arrived to me just shuttered. It probably weakened due to its age and got cracked during transport.
  • Parafin (or wax) is not included. The original one was too crumbled to include it. When I tested this machine on three different yarns, including 100% wool and 100% acrylic, I did not feel I needed it. There are two groups of knitters with regard to using wax: those who swear by it and those who care less. You decide which one you are for yourself
  • A bottle with oil is also not included. The one that came with this machine was too dark to use it. I recommend Gun oil. A lot of knitters use it and I use it to clean and oil all my machines.
  • Cast-on thread is also not included but any smooth yarn of the correct thickness can be used instead.

None of these missing assesories affect the functioning of the machine.

This machine was probably meant for the Japanese market. Thus, the wording on the carriage is in Japanese. But you will very quickly learn that the two button on the left-hand side are for tuck and the two buttons on the right-hand side are for “slip” patterns. The position of these buttons is standard across all Japanese knitting machines.

I also felt that the buttons on this machine needed an extra strong push to remain in their pushed position ( I had to do it with my thumb, which is stronger, than an index finger). Just keep that in mind while playing with buttons.

I always convert the fabrics I create while testing the machines into cowls/neck warmers, which I then donate to local charities. Here is what I got while testing this machine:

Overall, I was pretty impressed with this model and this machine. I so wanted to play and experiment with how many different patterns I can come up with I hope you will enjoy experimenting with it too.

Brother KH 551 knitting machine refurbished in October 2022

This is my Brother KH551 machine tested and cleaned in October 2022.

The machine passed all my tests. I tested how needles move during their push-button selection and tested slip/part and tuck stitch patterning. I tested how this machine knits on a full bed using somewhat challenging yarns: boucle, fuzzy (mohair-like), and yarn with boucle-like specs. All knitted fabrics looked beautiful.

I installed a new sponge bar, checked ALL needles, ran several tests on them to make sure all latches are moving freely, and replaced all damaged needles with new (aka, from old stock) or with refurbished ones. After all this, I typically knit on the full bed to ensure that I did not miss anything while inspecting the needles. If needles do not knit properly (which I judge by the defects in the knitted fabric), I replace them.

I did not see any defects in the fabric – please, refer to my video for details.

The machine came to me with several accessories missing and without a hard copy manual.

  • The hard copy of the manual can be found here;
  • The toolbox which stores all accessories did not come with this machine. I placed all the tools in a bag and securely attached it to the bed for easier transport during shipping
  • I typically discard the oil/grease that comes with these old machines because of their age. I recommend using gun oil, which can be purchased here.
  • The small bag that stores the needles had to be thrown away. It is simply a container that holds them and is not critical
  • The sinker plat yarn hangers did not come with this machine. See page 19 in the manual on what these are needed for. I feel that their use is pretty specific – for plating. I consider myself an intermediate machine knitter and I am yet to learn this plating technique. I also feel that these yarn hangers can be imitated by a simple paper clip.

All knitting machines have their own characters and this one was no exception. I felt that it is somewhat more sensitive to tension or maybe I was just testing it with a challenging yarn. So, I discovered that it liked slightly more than average tension. I had to hang the weights to the corners of the knitted panel every other 10-15 rows or so. I needed to pay A LOT OF attention to the tension in the mast and adjust the tension on the dial. In general, on all machines, all projects will require several tests and swatches to determine the best yarn/tension combination.

Because this yarn was a bit more sensitive to tension, I am including complimentary claw weights (see the picture below, they are typically NOT included with a standard KH551 set).

Let’s talk about the imperfections of this machine:

The needle selection tools also had seen their days. But they still feel smooth to the touch.

My video shows some minor bents on the case.

The most annoying imperfection to me was a twitching row counter. I tried to fix it, oil it, and replace parts – to no avail. I feel that the plastic rotating gears wore over time and make the numbers twitch a bit when transitioning from 9 to 10 and from 19 to 20. I did not notice this twitching for other transitions. The operator simply needs to nudge the row counter during these transitions to keep the correct row count.

Overall, I would definitely consider having KH551 in my machine collection. It is a sturdy and hard-working machine. I hope its new owner will think so too.

Read more about this model in my previous posts on Brother KH551.

http://thoughtsandknits.com/2021/11/01/my-first-restored-and-tested-kh551-knitting-machine/

Brother KH551 – my second one

http://thoughtsandknits.com/wp-admin/post.php?post=1644&action=edit

Brother KH 930E, my second one, restored/cleaned/tested in October 2022

What was done with this machine in terms of cleaning and refurbishing:

  • Included tools that were missing (some are still missing-please read below). All major parts and assesories are included.
  • Cleaned outside
  • Opened the lid and cleaned under the lids using only isopropanol around the electronics
  • Inserted absolutely new sponge and a retaining bar (it is NOT a refurbished retaining/sponge bar). So, it should last longer.
  • Inspected all needs – run 2-3 visual inspections under different “angles”. Replaced all defective needles with brand-new ones.

All assesories are included except for:

  • Pattern book (it can be downloaded from here)
  • A hard copy of the manual (it can be downloaded here. The pdf cover page states that the manual is for KH940 but KH940 and KH930/930e are identical in their operations. The only difference between KH940 and KH930/930e is the size of the electronic storage memory: KH940 has more memory.)
  • Design sheets (they are simply graph paper; if you REALLY need it, any graph paper would do)
  • Tapestry needle (any plastic or metal needle would do)
  • Oil (the container that came with the machine was empty; but regardless – I recommend using newer/fresher oil. I typically use this gun oil)
  • Wax (the one that came with the machine was too old and crumbled)

Here are the pictures of all accessories. They all fit into a small build-in compartment (see the two left-hand side photos below).

The hole in the carriage handle is to attach the machine to the motor. The previous owner made this hole, not me. I don’t own such a motor!!!

Tests performed on this machine:

  • Tested needle selection – works great!
  • Tested on a full bed tuck, slip/part and fair isle – all worked great.
  • Tested file transfer – work great! Knitted a small item from this custom pattern.

Read more about pros and cons of this model in my Knitting Machine Encyclopedia: https://mightyknittymachines.com/brother-kh930-electronic-knitting-machine/

Additional notes on this machine:

  1. During tuck knitting, I always check the tuck wheels to make sure that they are always in their working position (pushed forward). I reach with my hand under the sinker plate while it is still on the bed and check it. When they accidentally slid back, the stitches move slightly forward on the needles and the nest row does not form correctly and a lot of looping occurs. So, this is why in the video you will see me constantly checking under the sinker plate. Once I figures out what to look for in my stitches (namely, not too much moving forward on the needles), I stopped checking these wheels/brushes. I also feel that if this problem occurs, the operator should play a bit with the tension (on the tension mast and on the tension dial) of their yarn. Also, tuck-stitching requires an optimized yarn tension and weight combination.
  2. The machine is somewhat sensitive to the yarn tension. Honestly, they all are so I recommend when starting a new yarn to play with tension on a small swatch before making a garment and knitting fast.
  3. The eight pins where the transfer cable gets inserted are fragile. Please be careful.
  4. Always turn off and even unplug this machine when not using its patterning capabilities. There are stories about motherboards being damaged if left for too long in ON condition. If this happens, replacement boards are available for purchase from somewhere in Honk Kong (but it is a reliable source).

The transfer cable is NOT included. I used my personal one.

Enjoy!

Singer 360K for Philip

Overview and run down of Singer 360 K for Philip

Test performed: full bed stockinet, slip, fair isle, 1×1 mock ribbing.

Sport yarn is the best. Thicker (e.g., worsted yarn – best on every other neelde).

I did not extensively test the knit leaders but all knobs and levels work.

The machine came with some assesories and some I added. I added a set of punch cards. The set is brand new but differs a bit from the original Singer/Studio set. The machine came with some knit leader sheets, and they will be included.

The overveiw is below.

Missing are:

  • Oil canister. I do not include old oil on purpose. Please, get a fresh/new oil. The recommended by many machine kntiters is Hoppe’s Elite Gun Oil
  • Only one ravel cord in included but any smooth strong yarn can be used
  • only one set of point cams (number 15) and yarn separators were included. These are usd for single-motif knitting. This is somewhat advanced technique and if you are proficient enough with just one single motif (two sets are needed to knit two single motifs) you will know by then where to get additional sets. To be honest, I tried single single-motif and it was so challenging that I simply gave up. It is challenging by all the small details needed to kniw a single motif. There are other machines to do it much easier. Plus, I like motifs throughout the whole bed anyways… But with just one set of point cams and yarn separators you will still be able to knit just one single motif.


All tools fit into a built-in storage.

The machine itself is in great shape.

There are couple of impercets on the plastic and on the cover.

They are:

  • Masking tape stain on the tool box lid

Some writing on the carriage. I wiped it but did not rub too much to avoid damaging already old and potentially brittle plastic.


The case and the lid have minor scratches and minor bend. The most prominent is the red stain on the lid.


The strip with numbers has some minor staining (seen on video).


Video just for you:


I also recommend getting this small cast-on comb. (I am not affiliated with them). It makes the cast on so much easier for beginners…


Manual and recommended brochures specifically for this machine are here:

(but keep in mind that I am sending you generic punch cards – they might not match the numbers shown in the third brochure).

https://mkmanuals.com/knitmaster-360-260-knitting-machine-manual.html

https://mkmanuals.com/knitmaster-360-260-operation-knitting-machine-manual.html

https://mkmanuals.com/knitmaster-360-260-pattern-book-knitting-machine-manual.html

Please read my other post on overall pros and cons of Singer/Studio knitting machines and 360K model in general.

http://thoughtsandknits.com/2022/09/04/360-for-laura-cleaned-in-august-2022/

http://thoughtsandknits.com/2022/08/07/studio-360-k-memomatci-reported-in-august-2022/

Second Singer Studio 360 Mod restored/cleaned/refurbished in March 2022

http://thoughtsandknits.com/2021/10/13/my-first-singer-360-memomatic-360k/


Some pictures as I am putting the whole package together.

Brother KH551 tested and cleaned in September 2022

Preface: If I had to describe this machine with just one word – it would be FLAWLESS!!!

But, first, a little bit of history. Brother KH551 knitting machines were introduced to the market in the 1960s and were the first machine with somewhat semi-automatic patterning capabilities. In this machine, there are 4 buttons, that you push to prepare for the needle selection and then rotate the knob (using the wrench) to select the corresponding needles. It is an excellent machine for beginning knitters. I feel that it would be also great for people who are not quite yet ready to give up hand-knitting but want to have more even stitches and a bit faster progress…. Brother KH551 is also lighter than other machines mostly because its bed is narrower. The carriage is also significantly lighter and I could easily move it with just one hand.

The machine comes with heavy-duty cast-on combs that eliminate the need for any other weights. As you can see from my video, I did not attach any additional weights and had only one small problem with an uneven stitch which is amazing considering no additional weights and a rather difficult (with specs and boucle) yarn.

Not the whole machine is light, but the carriage is also light and small and is ideal for somebody with small hands and not a lot of upper body strength. Its lightweight makes it pretty portable, compared to other machines. The machine is capable of plain old knitting with hand manipulations of the needles. But also is capable of semi-automatic needle selection. The petiteness of the machine also makes it easier to store when not in use. I like the three-thread tension mast and a yarn clip in from of the tension mast rod. I love the three-horned tension section of the mast (not just a triangle) where each color of yarn can be inserted individually. However, the tension on the second and middle tension disk only has two settings (although they might depend on the very right one).

One feature of this model that I have not observed in others: There is some kind of protective lever at the end of the bed because the machine does not slide very easily from the end of the bed. One has to work really hard to “accidentally” pull it off the machine. In the video, you will see me seemingly struggling with the carriage towards the bed’s end (when knitting on a full bed only). But the knitting itself did not struggle: I believe it was just that protective mechanism in action.

The setup includes all major accessories. A couple of minor things are missing:

  • Sinker plate yarn hanger. The machine came with only one. However, when or if or both you decide to knit using the plating technique (see p. 18-19 in the manual), you can just make a similarly shaped hanger out of a heavy-duty paper clip). On other machines, when I knitted multicolor slip- and tuck-patterns, I was just leaving the thread on the side of the machine to keep it out of the way…Regardless of the technique you chose, the absence of this part does not affect the machine’s functioning and you can still do a LOT of various things with it using a variety of techniques.
  • I did not want to include the old container with oil because I did not want to risk putting such old oil onto this machine. I recommend getting a Hoppe’s gun oil (this is what I used to clean the needles and lightly oil the machine) and oil only lightly on the parts mentioned in the manual.

This machine comes with two brochures: a hard copy of the manual (which is in great shape) and a knitter’s guide (which contains techniques, a bunch of how-tos advice, and a couple of examples on garment knitting). I used this brochure when I knitted my sweater last year (using another KH551). The manual is also available online but the scanned copy is not of great quality.

I tested this machine and other KH551 and I was very pleasantly surprised by how well it handles potentially challenging yarns. This machine handled boucle yarn without any problems. In fact, I did not even have to restart the knitting of this shawl. Check out a pretty pathetic attempt of me modeling it below. I later added decorative edging to the shawl. I found a yarn that matched the color of the tiny yarn specs (boucle), made a cord out of it, and then attached it to the edges. I actually like how it turned out. Light yet warm garments are the most favorite types of garments for my constantly-cold petite body.


A couple of other things I liked about KH551: Love the small container for tools. I like that it is so easy to remove and position onto the bed. I also love a special container that stores all the tools when not in use. The table clips are somewhat different than the younger models. It is first screwed onto the case and then onto the table.

I removed all the needles, cleaned them and inspected them all individually. I then knitted on a full bed machine, which helps me to identify faulty needles even more: when there is a propagating error or a flaw in the knitting that appears in the same place, it is definitely due to faulty needles.

A couple of disclaimers about this machine. The case (lid and the bottom part) has several very small dents (hey – it is over 50 years old after all! It is like us having age spots and wrinkles). The table clamp attachments (on the bottom portion of the case) were rusty and I cleaned them and painted those areas with rustoleum to slow down or even prevent further rusting to extend the life of this wonderful machine. It appeared to be the only place, where I observed rust on the main bed. There is some rust on the lid – at the ends where the metal ends touch the cover panel.

I replaced the sponge bar and cleaned the machine, carriage and sinker plate from dust/lint.

The row counter is easy to operate: also shows how many rows remained and how many rows are current. The numbers do not jump uncontrollably as in a couple of other machines I tested when you are trying to re-zero the ones- or tens positions. Basically, the numbers do not slip when you turn the wrong way. This type of row counter is actually my most favorite out of all other machines I tested.

To summarize, below are the lists of pros and cons for the Brother KH551:

Pros:

+ Carriage is very light and slides very easily

+ The bed is narrower than other machines – which makes it more compact

+ …and makes the machine lighter than other similar models

+ relatively easy deep cleaning – all parts are solid and straightforward to insert/assemble/disassemble

+ The needle count is engraved on the bed – so these slippery and constantly in-the-way paper liners showing the needle count won’t annoy you by constantly sliding and getting lost.

+ Threading the yarn is a bit more intuitive and straightforward in my opinion

+ built-in capabilities for 3 different yarns

+ the hard case is a combination of fake leather and plastic, which makes it not only look neater and nicer than other machines but also made durable. The case shows absolutely no discoloration despite the age of this machine.

Cons:

  • The push-button mechanism helps to select the needles but you need to change the needles selected quite often (basically turn the ratchet tool to SET and OFF). It might be tedious and you need to keep track of the correct order. When I tested this machine, I got into this zen-like rhythm that helped no prevent mistakes…
  • Some might find the machine too simple – yes, it has only limited patterning capabilities. However, with manual needle selection and yarn manipulation, the possibilities are endless.
  • I discovered some typos in the manual when I was testing the patterns. I vaguely remember that I’ve seen an addendum to correct the errors but I cannot find it now. Maybe it was for another machine… Just keep it in mind when you try the patterns from the manual and they are not working.

A little bit more about potential typos in the manual. I tried at least a dozen of times to knit the patterns on p. 33: a purl-like stitch on the left and another one on the right. The purl-like was either dropping stitches on the whole swatch or was tangling the yarn so bad that I had to start all over again multiple times…I do not exclude a complete operator failure….But: when I started reviewing the pattern on the right-hand side (the anonymous one on p. 33), I noticed some inconsistencies. I was still able to knit it but the pattern did not look like in the manual: see the picture below (the very top swatch) of what I got and compare it to the manual – two big differences. Well, at least the swatch did not fall off the bed like in the case of the “purl-like” pattern attempt. But that pattern (on the right-hand side in the manual) definitely had typos: Look at the schematics: it shows TUCK but the description writes PART. I vaguely remember seeing an addendum to one of the manuals of the machines I refurbished last year… Maybe the purrlike stitch pattern on the left also had typos/errors and this is why I could not figure it out… But I successfully knitted herringbone (not shown in my video – sorry), seed stitch A, seed stitch B (pics below and on a video), and diamond design (pattern I in the book on p28)….I then knitted these patterns on the whole bed and converted what I got into a hood/neck warmer/cowl…

Not much else to say about this machine left, other than it was an extremely pleasant experience working on it. Indeed, now, after failed attempts to knit a “purl-like” pattern, I want to go back and experiment with all possible knob and lever combinations to see what other UNKNOW YET patterns I will come up with.